
Enhance the security of your SSH access by adding two-factor authentication (2FA) for an extra layer of protection on your remote connections.
Step 1. Install the 2FA Authenticator App
First, install a 2FA app on your phone for SSH. This app gives you time-sensitive codes as the second step in the login process.
Popular options for these apps include Google Authenticator and Microsoft Authenticator, which can be obtained from the app stores on Android and iOS devices.
- Google Authenticator for Android
- Google Authenticator for iOS
- Microsoft Authenticator for Android
- Microsoft Authenticator for iOS
In this tutorial, we'll use the Google Authenticator app. Make sure to have it installed on your mobile device because later in step 3, we'll use it for the initial setup of 2FA with your SSH server.
Step 2. Install Google’s PAM Authenticator Module
Google Authenticator is a software tool for two-factor authentication (2FA), using the Time-Based One-Time Password (TOTP) Algorithm and HMAC-based One-time Password (HOTP) Algorithm to authenticate users in software applications.
To set up your Linux system for this, you need to install the necessary package, either "libpam-google-authenticator" or "google-authenticator," depending on your distribution.
Ubuntu / Debian
sudo apt install libpam-google-authenticatorRocky Linux / AlmaLinux
sudo dnf install epel-release
sudo dnf install google-authenticator
Fedora
sudo dnf install google-authenticatorArch Linux
sudo pacman -S libpam-google-authenticatorStep 3. Configure Google Authenticator
To do so, open the terminal and execute the google-authenticator command
google-authenticatorMoving forward, you'll need to respond to a couple of questions, starting with, "Do you want authentication tokens to be time-based?" Respond with "y" to activate Time-Based One-Time Passwords (TOTP).

A QR code will appear on your terminal. This is where your Google Authenticator app on your mobile device becomes important. Open the app, tap the "+" icon in the bottom right corner.
You'll see two options: "Scan a QR code" and "Enter a setup key." Since scanning the QR code directly from your device might be difficult due to its size, we'll choose the "Enter a setup key" option.
In the "Account" section, input a name as you like. Then, on your Google Authenticator app, enter the code from the "Your new secret key is" line displayed on the terminal into the "Key" field. Click the "Add" button.
In addition, you'll receive five emergency codes, store them securely.
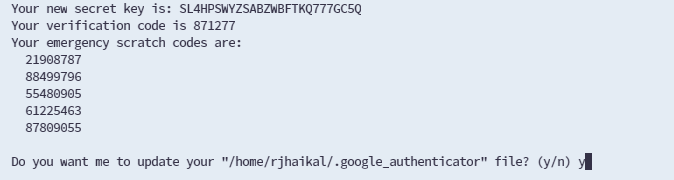
These codes are for single use, providing SSH access when your mobile device isn't available for code generation. Answer "y" when prompted to update the ".google_authenticator" file.
For the next question, to enhance security, once again, respond with "y" confirming your choice to prevent the reuse of the same code.

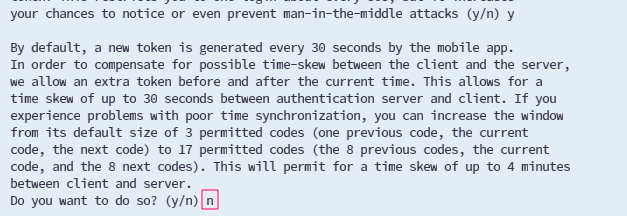
considering that choosing this option decreases security, it is strongly advised to respond with "n"
Lastly, reply with "y" to enable the rate limit, allowing a maximum of three login attempts within a 30-second window. This helps lower the risk of a successful brute-force attack on your SSH server.

Step 4: Configure SSH to Use Two-Factor Authentication
sudo vim /etc/ssh/sshd_configIf you discover either of these settings in the file, adjust their values to "yes." If they are not present, include them at the end of the file, as shown in the example below. Save the changes and exit the file.
KbdInteractiveAuthentication yes
ChallengeResponseAuthentication yes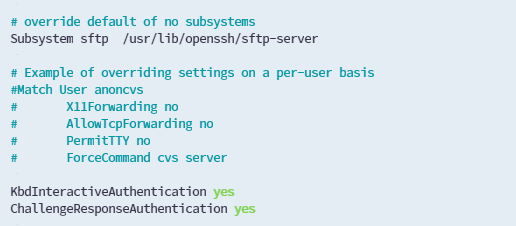
Finally, restart the SSH server, and then we can proceed to the last step of configuring two-factor authentication for our SSH server.
sudo systemctl restart sshStep 5: Setting Up PAM for SSH’s Two-Factor Authentication
PAM (Pluggable Authentication Modules) is vital in SSH authentication, offering a flexible framework. Instead of SSH having fixed authentication methods, PAM allows the integration of different authentication mechanisms as needed.
sudo vim /etc/pam.d/sshdadd the following line
auth required pam_google_authenticator.so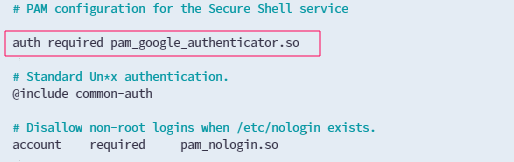
Step 6. Testing SSH 2FA
Try connecting to the server configured for two-factor authentication via SSH. You'll get a prompt for the verification code. Open the Google Authenticator app on your mobile device, and enter the 6-digit code it displays into the terminal.
root@rj-lab:~# ssh rjhaikal@rj-2fa-ssh
Verification code:
Password:
Welcome to Ubuntu 20.04.6 LTS (GNU/Linux 5.4.0-60-generic x86_64)

 * Documentation:  https://help.ubuntu.com
 * Management:     https://landscape.canonical.com
 * Support:        https://ubuntu.com/pro

  System information as of Mon Feb  1 01:30:43 UTC 2024

  System load:  0.0               Processes:             135
  Usage of /:   5.8% of 38.60GB   Users logged in:       2
  Memory usage: 10%               IPv4 address for ens3: 10.20.10.210
  Swap usage:   0%


Expanded Security Maintenance for Applications is not enabled.

32 updates can be applied immediately.
1 of these updates is a standard security update.
To see these additional updates run: apt list --upgradable

Enable ESM Apps to receive additional future security updates.
See https://ubuntu.com/esm or run: sudo pro status

New release '22.04.3 LTS' available.
Run 'do-release-upgrade' to upgrade to it.

rjhaikal@rj-2fa-ssh:~$
Check the systemd logs to confirm that the login process went well. Both the Google Authenticator code and the user's password were accepted without any problems.
Feb 01 01:30:43 rj-2fa-ssh sshd(pam_google_authenticator)[39091]: Accepted google_authenticator for rjhaikal
Feb 01 01:30:43 rj-2fa-ssh sshd[39089]: Accepted keyboard-interactive/pam for rjhaikal from 10.20.10.200 port 50828 ssh2
Feb 01 01:30:43 rj-2fa-ssh sshd[39089]: pam_unix(sshd:session): session opened for user rjhaikal by (uid=0)
Optional: Involving Key-Based Authentication in SSH 2FA
Disable password authentication to prevent users from logging in using their usual username and password. Instead, they will need to use alternative authentication methods, such as SSH key-based authentication.
Requirements: Copy Pubkey to Destination Server
sudo vim /etc/ssh/sshd_configPasswordAuthentication no
...
ChallengeResponseAuthentication yes
AuthenticationMethods publickey,keyboard-interactivesudo systemctl restart sshsudo vim /etc/pam.d/sshd
---
#@include common-auth
---Testing
root@rj-lab:~# ssh rjhaikal@rj-2fa-ssh
Verification code:
Welcome to Ubuntu 20.04.6 LTS (GNU/Linux 5.4.0-60-generic x86_64)

 * Documentation:  https://help.ubuntu.com
 * Management:     https://landscape.canonical.com
 * Support:        https://ubuntu.com/pro

  System information as of Mon Feb  1 01:42:18 UTC 2024

  System load:  0.0               Processes:             135
  Usage of /:   5.8% of 38.60GB   Users logged in:       2
  Memory usage: 10%               IPv4 address for ens3: 10.20.10.210
  Swap usage:   0%


Expanded Security Maintenance for Applications is not enabled.

32 updates can be applied immediately.
1 of these updates is a standard security update.
To see these additional updates run: apt list --upgradable

Enable ESM Apps to receive additional future security updates.
See https://ubuntu.com/esm or run: sudo pro status

New release '22.04.3 LTS' available.
Run 'do-release-upgrade' to upgrade to it.

rjhaikal@rj-2fa-ssh:~$


