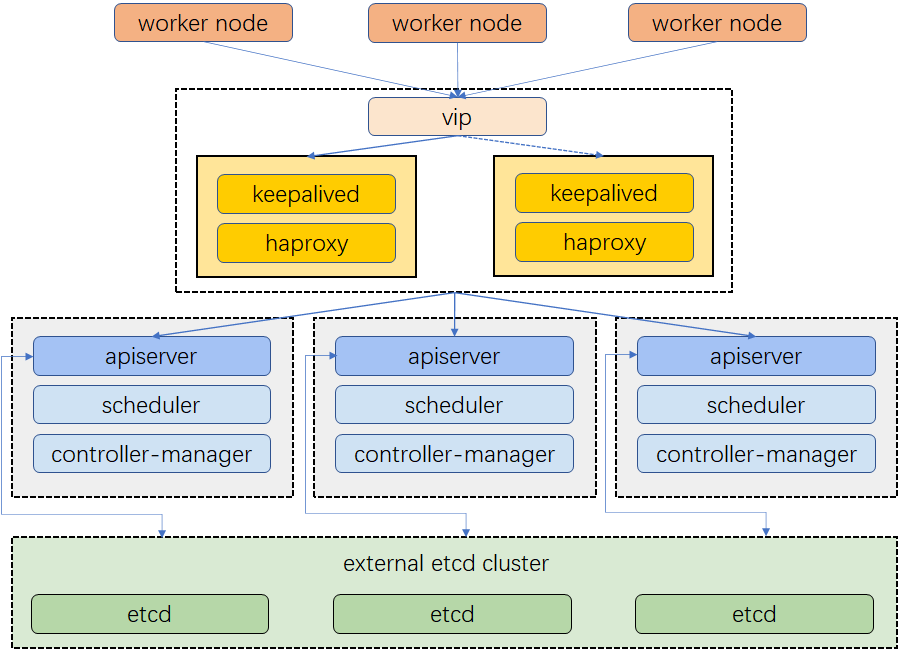
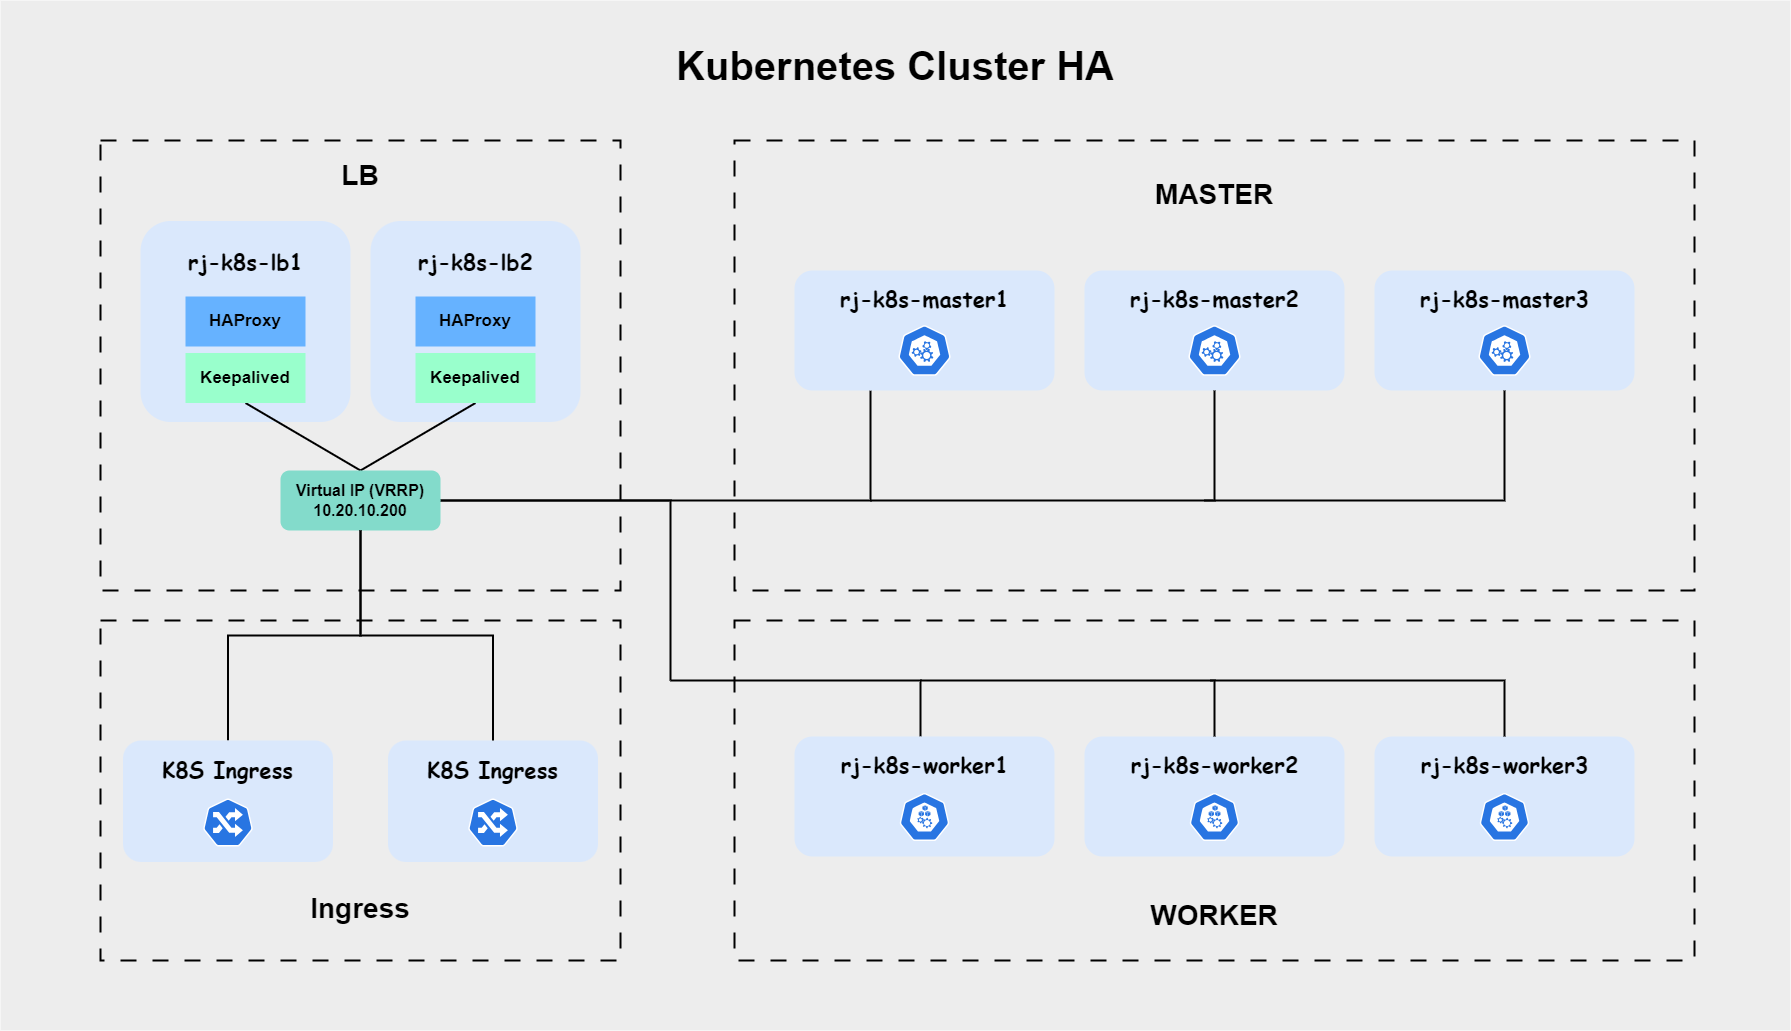
Specification: Kubernetes v1.24.x, Calico, Haproxy, Ingress-NginxLab Topology
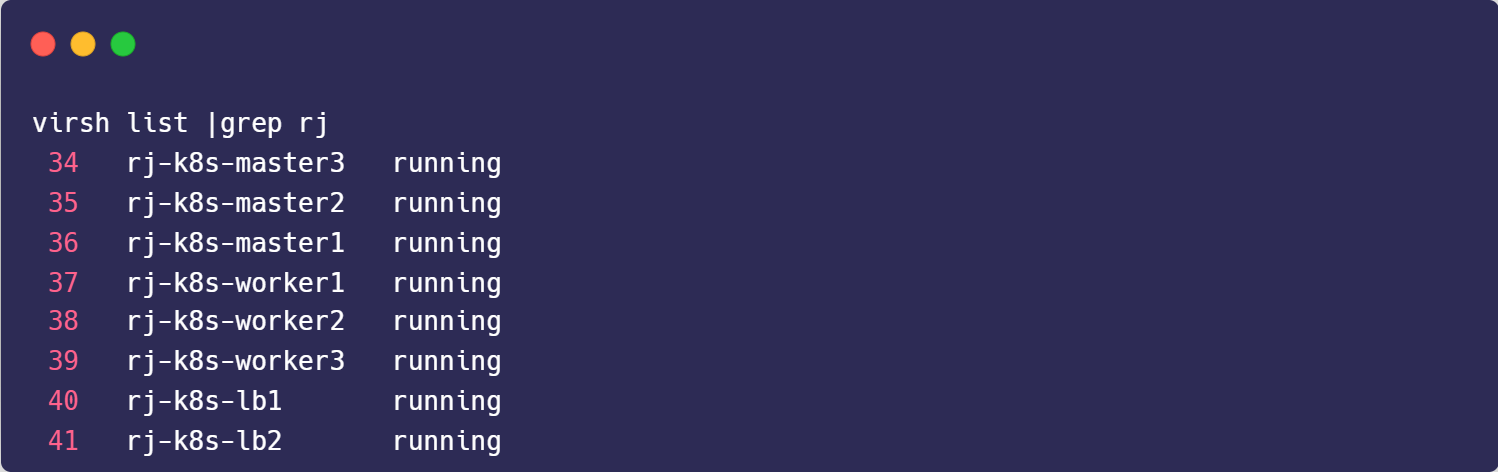
Prepare All VMs
Prerequisites OS
Execute on All Nodes
1. Mapping hosts on /etc/hosts.
cat<<EOF | tee -a /etc/hosts
# K8s HA
10.20.10.201 rj-k8s-master1
10.20.10.202 rj-k8s-master2
10.20.10.203 rj-k8s-master3
10.20.10.211 rj-k8s-worker1
10.20.10.212 rj-k8s-worker2
10.20.10.213 rj-k8s-worker3
10.20.10.101 rj-k8s-lb1
10.20.10.102 rj-k8s-lb2
10.20.10.200 kubernetes-vip
EOF
2. Update and upgrade all the packages
apt-get update -y; apt-get full-upgrade -yPrerequisites Kubernetes
Execute on All Nodes
1. Load overlay and br_netfilter kernal modules.
cat <<EOF | sudo tee /etc/modules-load.d/containerd.conf
overlay
br_netfilter
EOF
sudo modprobe overlay
sudo modprobe br_netfilter2. Edit system configurations for Kubernetes networking
cat <<EOF | sudo tee /etc/sysctl.d/99-kubernetes-cri.conf
net.bridge.bridge-nf-call-iptables = 1
net.ipv4.ip_forward = 1
net.bridge.bridge-nf-call-ip6tables = 1
EOF
sudo sysctl --system3. Install CRI-O
export OS=xUbuntu_20.04
export CRIO_VERSION=1.24

curl -L https://download.opensuse.org/repositories/devel:kubic:libcontainers:stable:cri-o:$CRIO_VERSION/$OS/Release.key | sudo apt-key add -
curl -L https://download.opensuse.org/repositories/devel:/kubic:/libcontainers:/stable/$OS/Release.key | sudo apt-key add -
echo "deb https://download.opensuse.org/repositories/devel:/kubic:/libcontainers:/stable/$OS/ /"| sudo tee /etc/apt/sources.list.d/devel:kubic:libcontainers:stable.list
echo "deb http://download.opensuse.org/repositories/devel:/kubic:/libcontainers:/stable:/cri-o:/$CRIO_VERSION/$OS/ /"| sudo tee /etc/apt/sources.list.d/devel:kubic:libcontainers:stable:cri-o:$CRIO_VERSION.list

sudo apt update
sudo apt-cache madison cri-o
sudo apt-cache madison cri-o-runc
sudo apt install -y cri-o cri-o-runc

sudo systemctl start crio
sudo systemctl enable crio
4. Disable swap
sudo swapoff -a
sudo sed -i '/ swap / s/^\(.*\)$/#\1/g' /etc/fstab
5. Add Kubernetes Repo
mkdir /etc/apt/keyrings
curl -fsSL https://packages.cloud.google.com/apt/doc/apt-key.gpg | sudo gpg --dearmor -o /etc/apt/keyrings/kubernetes-archive-keyring.gpg

echo "deb [signed-by=/etc/apt/keyrings/kubernetes-archive-keyring.gpg] https://apt.kubernetes.io/ kubernetes-xenial main" | sudo tee /etc/apt/sources.list.d/kubernetes.list

sudo apt update
6. Install kubectl, kubelet, & kubeadm packages
sudo apt install -y kubelet=1.24.6-00 kubeadm=1.24.6-00 kubectl=1.24.6-00
sudo apt-mark hold kubelet kubeadm kubectl
Configure HAProxy
Execute on:
- rj-k8s-lb1
- rj-k8s-lb2
1. Install haproxy and keepalived
apt install -y haproxy keepalived2. Configure Haproxy
# Kubernetes #
frontend kube-apiserver
    bind *:6443
    mode tcp
    option tcplog
    default_backend kube-apiserver

backend kube-apiserver
    mode tcp
    option tcp-check
    balance roundrobin
    default-server inter 10s downinter 5s rise 2 fall 2 slowstart 60s maxconn 250 maxqueue 256 weight 100
    server kube-apiserver-1 10.20.10.201:6443 check
    server kube-apiserver-2 10.20.10.202:6443 check
    server kube-apiserver-3 10.20.10.203:6443 check
3. Validate the configuration
haproxy -c -V -f /etc/haproxy/haproxy.cfg4. Restart HAProxy dan Enable HAPRoxy
sudo systemctl restart haproxy
sudo systemctl enable haproxy
Configure Keepalived
Execute on:
- rj-k8s-lb1
- rj-k8s-lb2
1. Create keepalived configuration file (rj-k8s-lb1)
cat<<EOF | sudo tee -a /etc/keepalived/keepalived.conf
vrrp_script chk_haproxy {
  script "killall -0 haproxy"
  interval 2
  weight 2
}

vrrp_instance haproxy-vip {
  state MASTER
  priority 101
  interface ens3                   # Network card
  virtual_router_id 255
  advert_int 1
  authentication {
    auth_type PASS
    auth_pass Gladiators82!
  }

  unicast_src_ip 10.20.10.101      # IP address of this machine
  unicast_peer {
      10.20.10.102                 # IP address of peer machines
  }

  virtual_ipaddress {
    10.20.10.200/32                # The VIP address
  }

  track_script {
    chk_haproxy
  }
}
EOF
2. Create keepalived configuration file (rj-k8s-lb2)
at<<EOF | sudo tee -a /etc/keepalived/keepalived.conf
vrrp_script chk_haproxy {
  script "killall -0 haproxy"
  interval 2
  weight 2
}

vrrp_instance haproxy-vip {
  state BACKUP
  priority 100
  interface ens3                   # Network card
  virtual_router_id 255
  advert_int 1
  authentication {
    auth_type PASS
    auth_pass Gladiators82!
  }

  unicast_src_ip 10.20.10.102     # IP address of this machine
    unicast_peer {
        10.20.10.101              # IP address of peer machines
  }

  virtual_ipaddress {
    10.20.10.200/32             # The VIP address
  }

  track_script {
    chk_haproxy
  }
}
EOF
3. Allow a process to bind to a non-local IP address
echo "net.ipv4.ip_nonlocal_bind=1" | sudo tee /etc/sysctl.d/ip_nonlocal_bind.conf
sudo sysctl --system
4. Restart keepalived
sudo systemctl restart keepalived
sudo systemctl status keepalived
sudo systemctl enable keepalived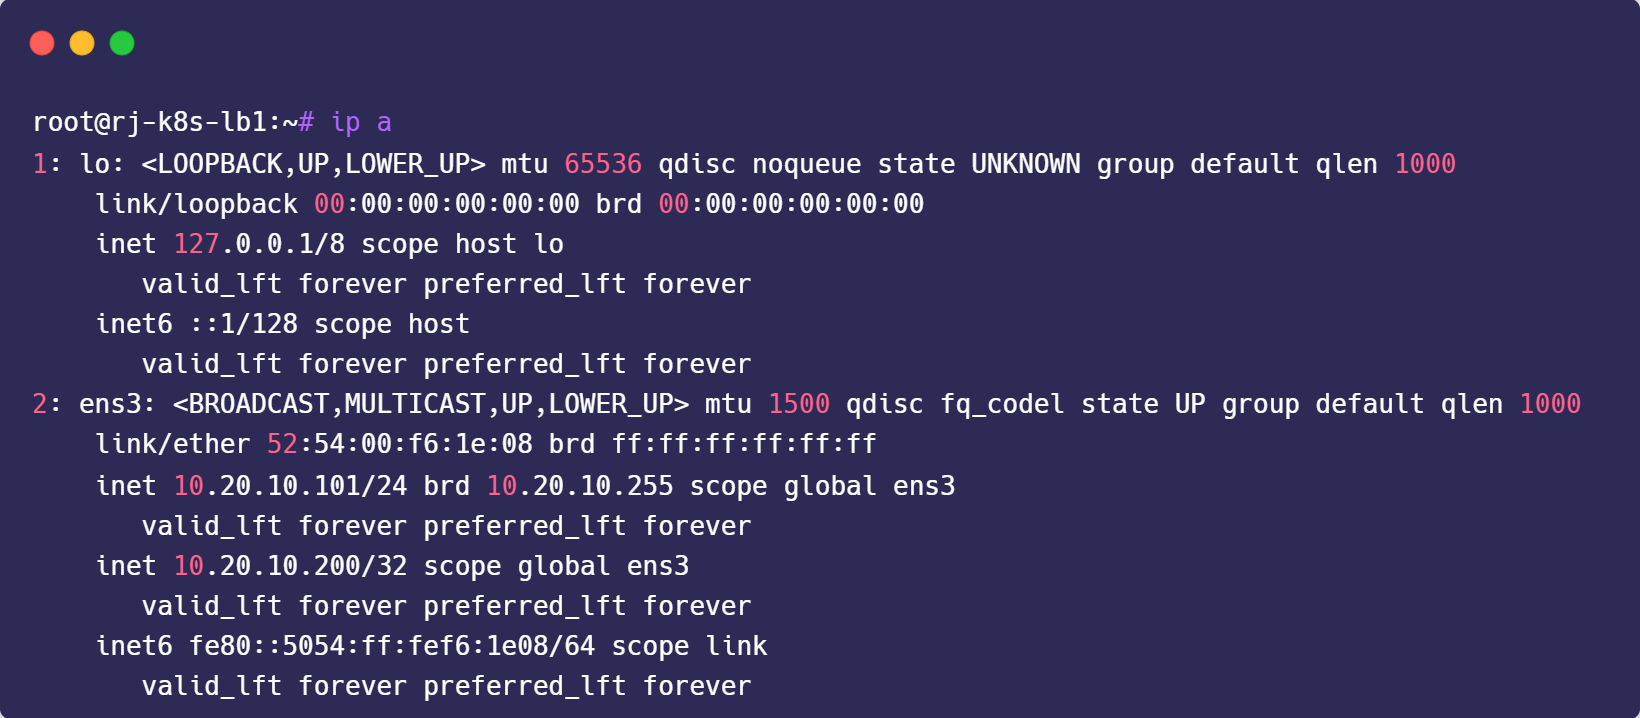
Bootstrap Kubernetes Master
Execute on rj-k8s-master1
1. Bootstrap master node
kubeadm init --pod-network-cidr=10.244.0.0/16 --control-plane-endpoint "kubernetes-vip:6443" --upload-certs --kubernetes-version 1.24.6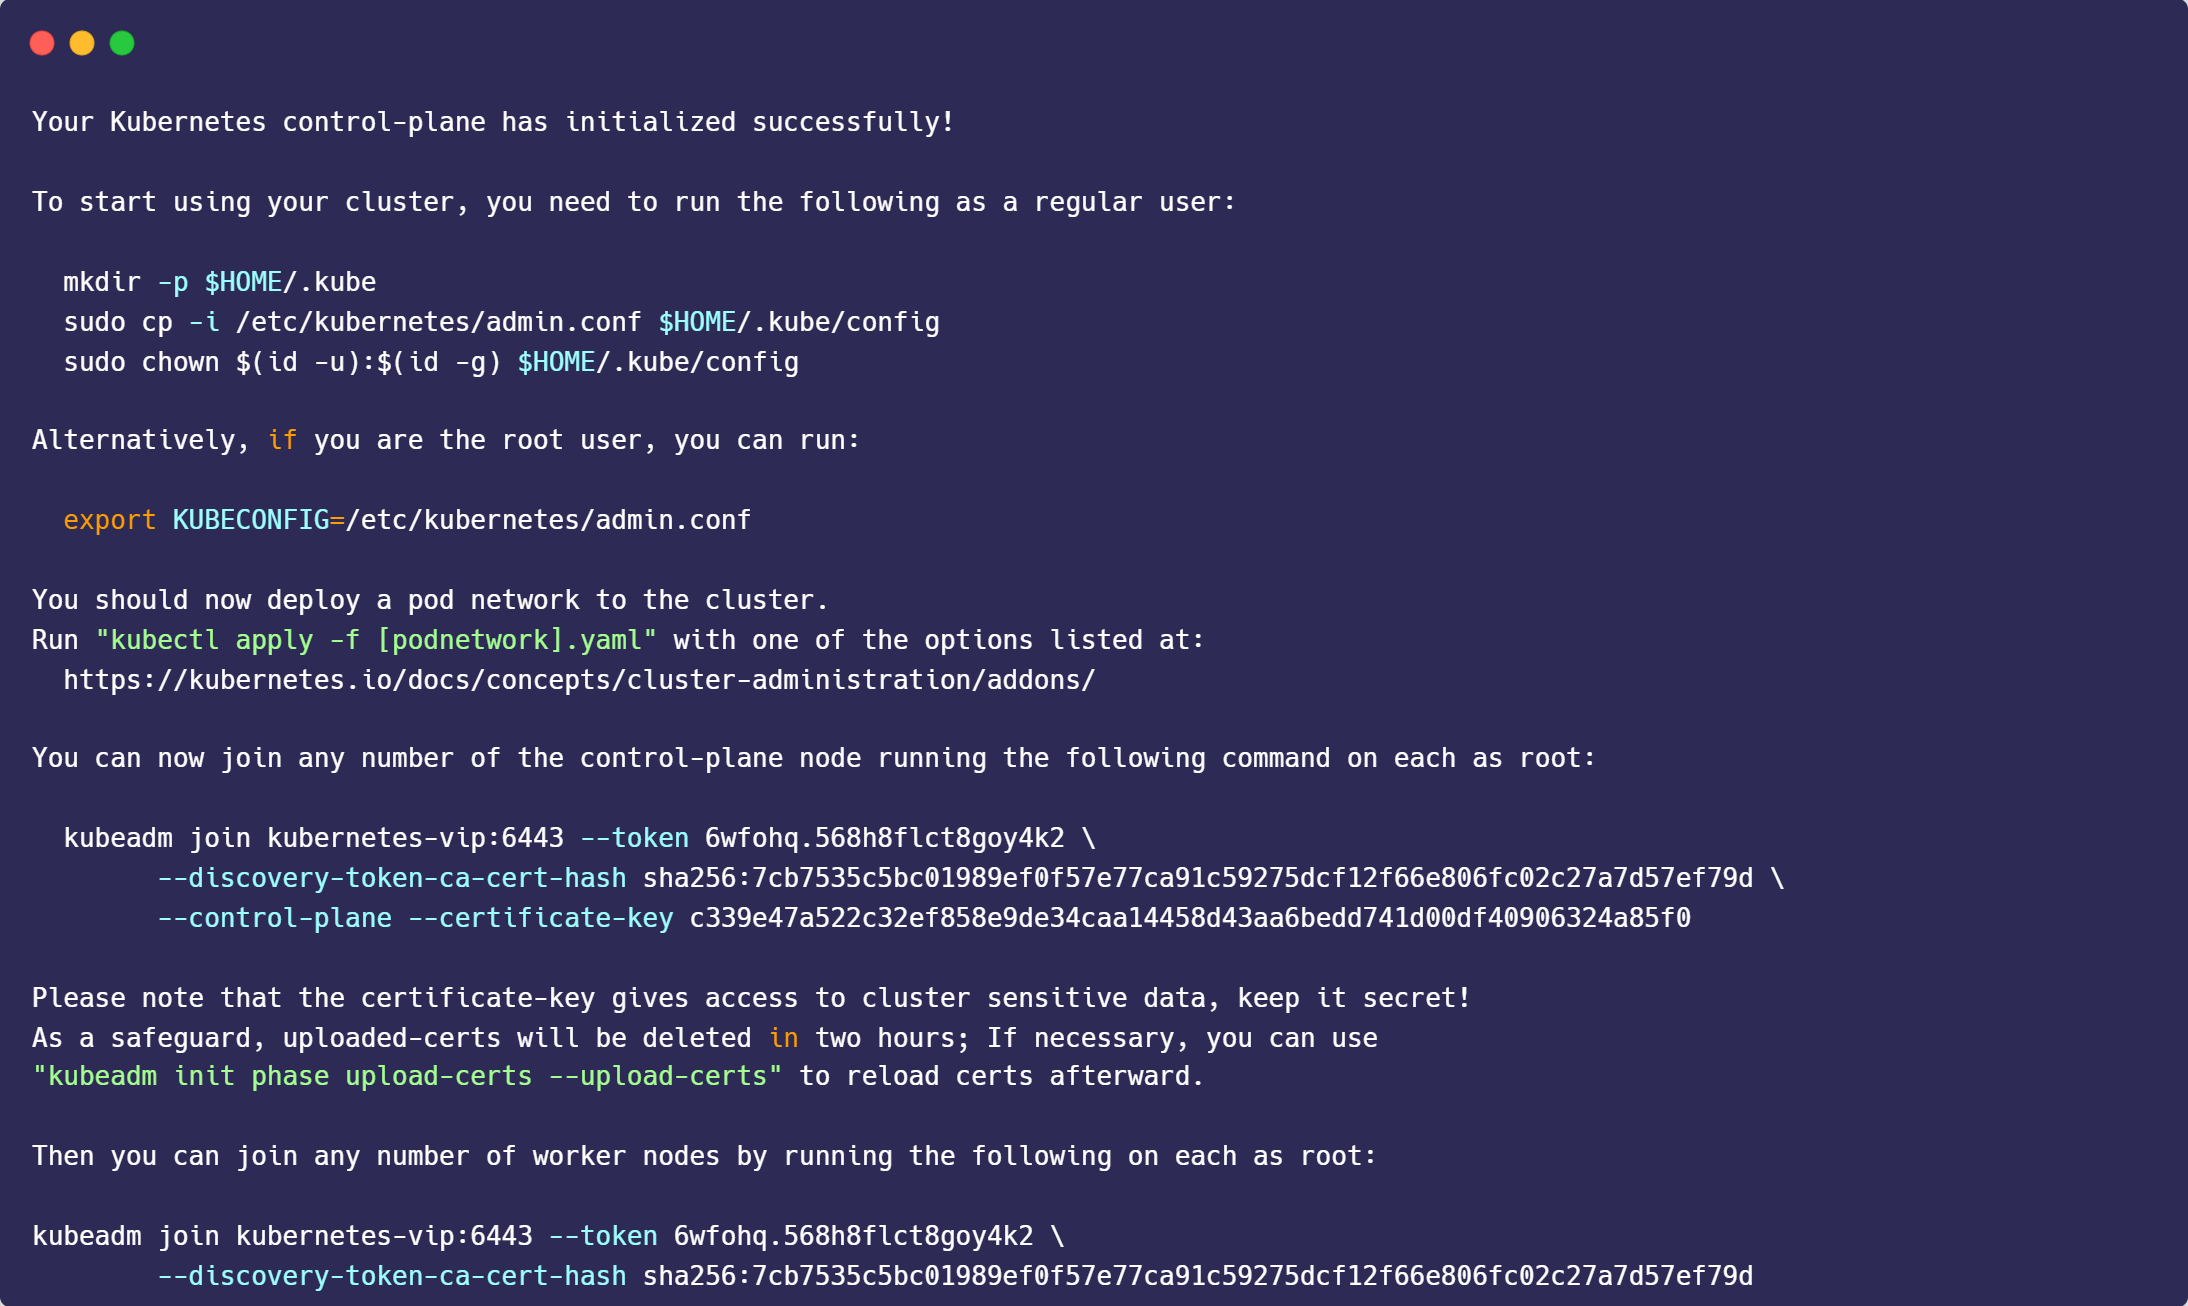
2. Create Kube Config
mkdir -p $HOME/.kube
sudo cp -i /etc/kubernetes/admin.conf $HOME/.kube/config
sudo chown $(id -u):$(id -g) $HOME/.kube/config
Install Calico Networking (CNI)
1. Download the Calico networking manifest for the Kubernetes API datastore.
curl https://raw.githubusercontent.com/projectcalico/calico/v3.26.1/manifests/calico.yaml -O2. Edit calico.yaml
vim calico.yaml- name: CALICO_IPV4POOL_CIDR
value: "10.244.0.0/16"
3. Apply manifest
kubectl apply -f calico.yamlJoin Master Nodes
Execute on :
- rj-k8s-master2
- rj-k8s-master3
1. Register Master Nodes
kubeadm join kubernetes-vip:6443 --token 6wfohq.568h8flct8goy4k2 \
        --discovery-token-ca-cert-hash sha256:7cb7535c5bc01989ef0f57e77ca91c59275dcf12f66e806fc02c27a7d57ef79d \
        --control-plane --certificate-key c339e47a522c32ef858e9de34caa14458d43aa6bedd741d00df40906324a85f0
mkdir -p $HOME/.kube
sudo cp -i /etc/kubernetes/admin.conf $HOME/.kube/config
sudo chown $(id -u):$(id -g) $HOME/.kube/config
Join Worker Nodes
Execute on:
- rj-k8s-worker1
- rj-k8s-worker2
- rj-k8s-worker3
- rj-k8s-lb1
- rj-k8s-lb2
1. Register Worker Nodes
kubeadm join kubernetes-vip:6443 --token 6wfohq.568h8flct8goy4k2 \
        --discovery-token-ca-cert-hash sha256:7cb7535c5bc01989ef0f57e77ca91c59275dcf12f66e806fc02c27a7d57ef79d
Labels & Taints Worker and Ingress Nodes
1. Create label for worker nodes and ingress nodes
kubectl label node rj-k8s-worker1 node-role.kubernetes.io/worker="worker"
kubectl label node rj-k8s-worker2 node-role.kubernetes.io/worker="worker"
kubectl label node rj-k8s-worker3 node-role.kubernetes.io/worker="worker"
kubectl label node rj-k8s-lb1 node-role.kubernetes.io/ingress="ingress"
kubectl label node rj-k8s-lb2 node-role.kubernetes.io/ingress="ingress"
2. Create Taint for Ingress Nodes
kubectl taint node rj-k8s-lb1 dedicated=ingress:NoSchedule
kubectl taint node rj-k8s-lb2 dedicated=ingress:NoSchedule
Deploy Ingress Nginx for Bare Metal Cluster
Execute on rj-k8s-master1
1. Download Manifest
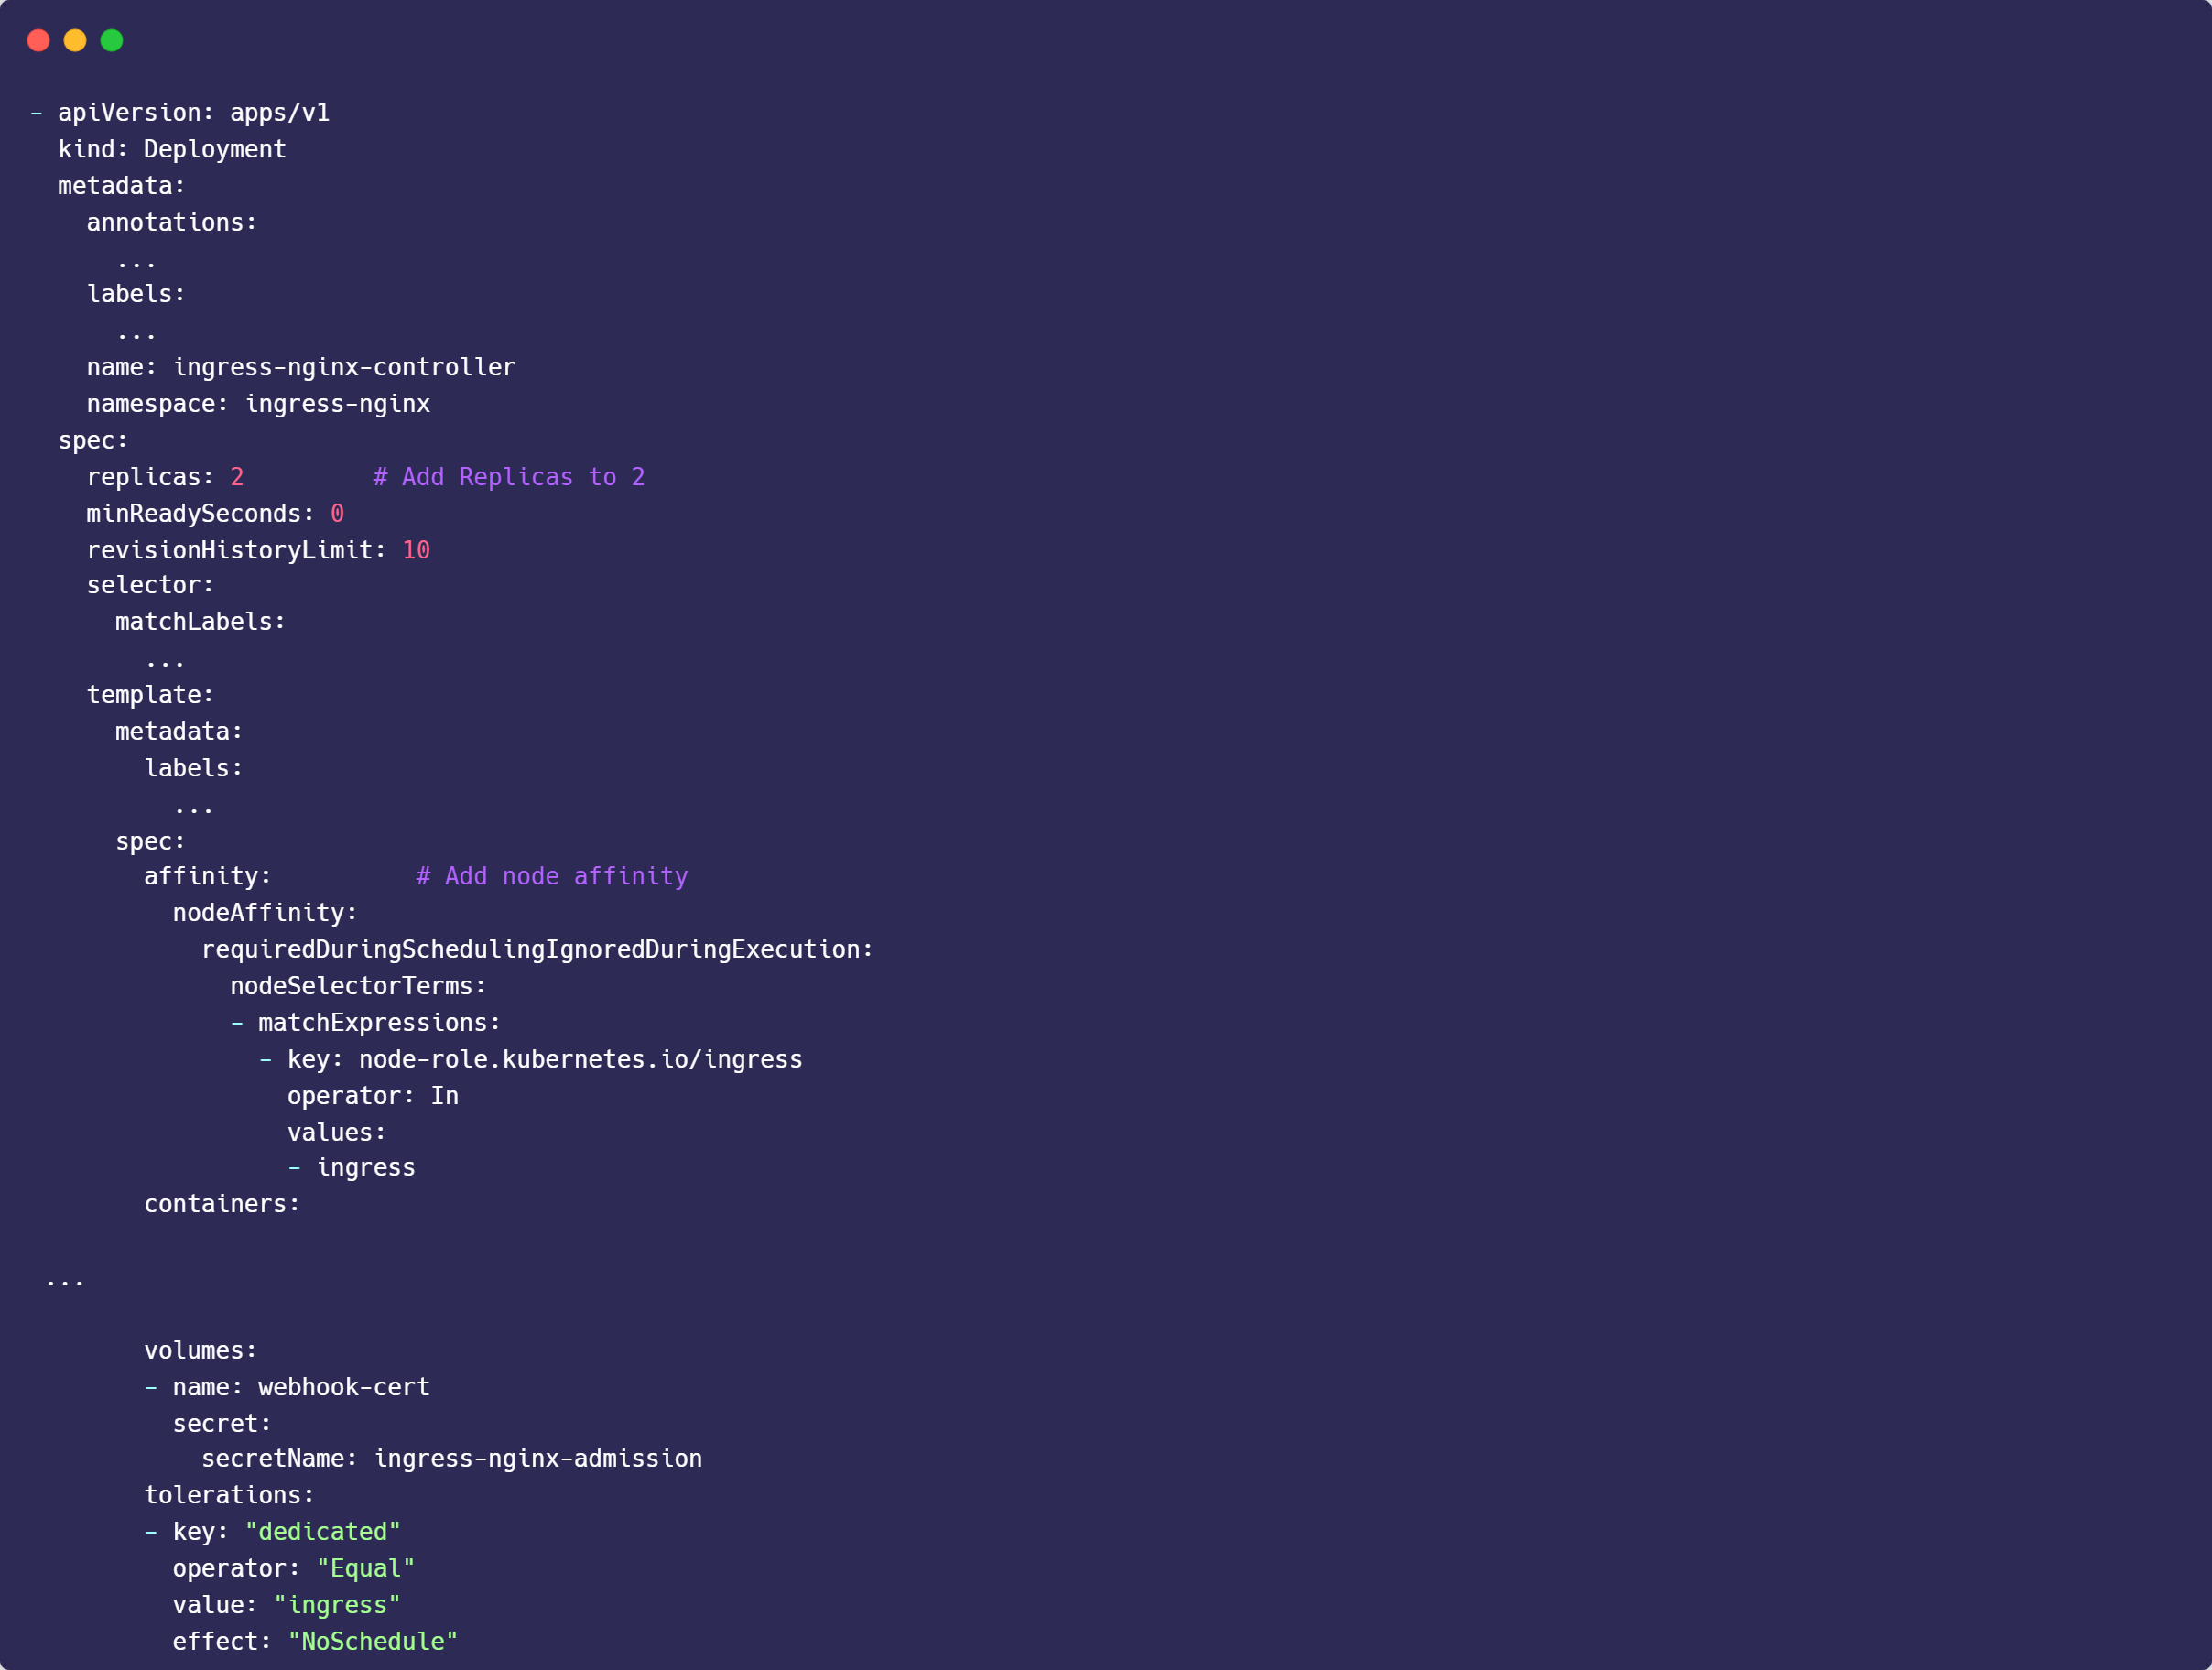
wget https://raw.githubusercontent.com/kubernetes/ingress-nginx/controller-v1.8.0/deploy/static/provider/baremetal/deploy.yaml2. Edit deploy.yaml
# Set Replicas to 2
   replicas: 2

# Add node affinity on deployment
     spec:
        affinity:
          nodeAffinity:
            requiredDuringSchedulingIgnoredDuringExecution:
              nodeSelectorTerms:
              - matchExpressions:
                - key: node-role.kubernetes.io/ingress
                  operator: In
                  values:
                  - ingress

# Add pod toleration on ingress container
       tolerations:
        - key: "dedicated"
          operator: "Equal"
          value: "ingress"
          effect: "NoSchedule"
3. Apply Configuration
kubectl apply -f deploy.yaml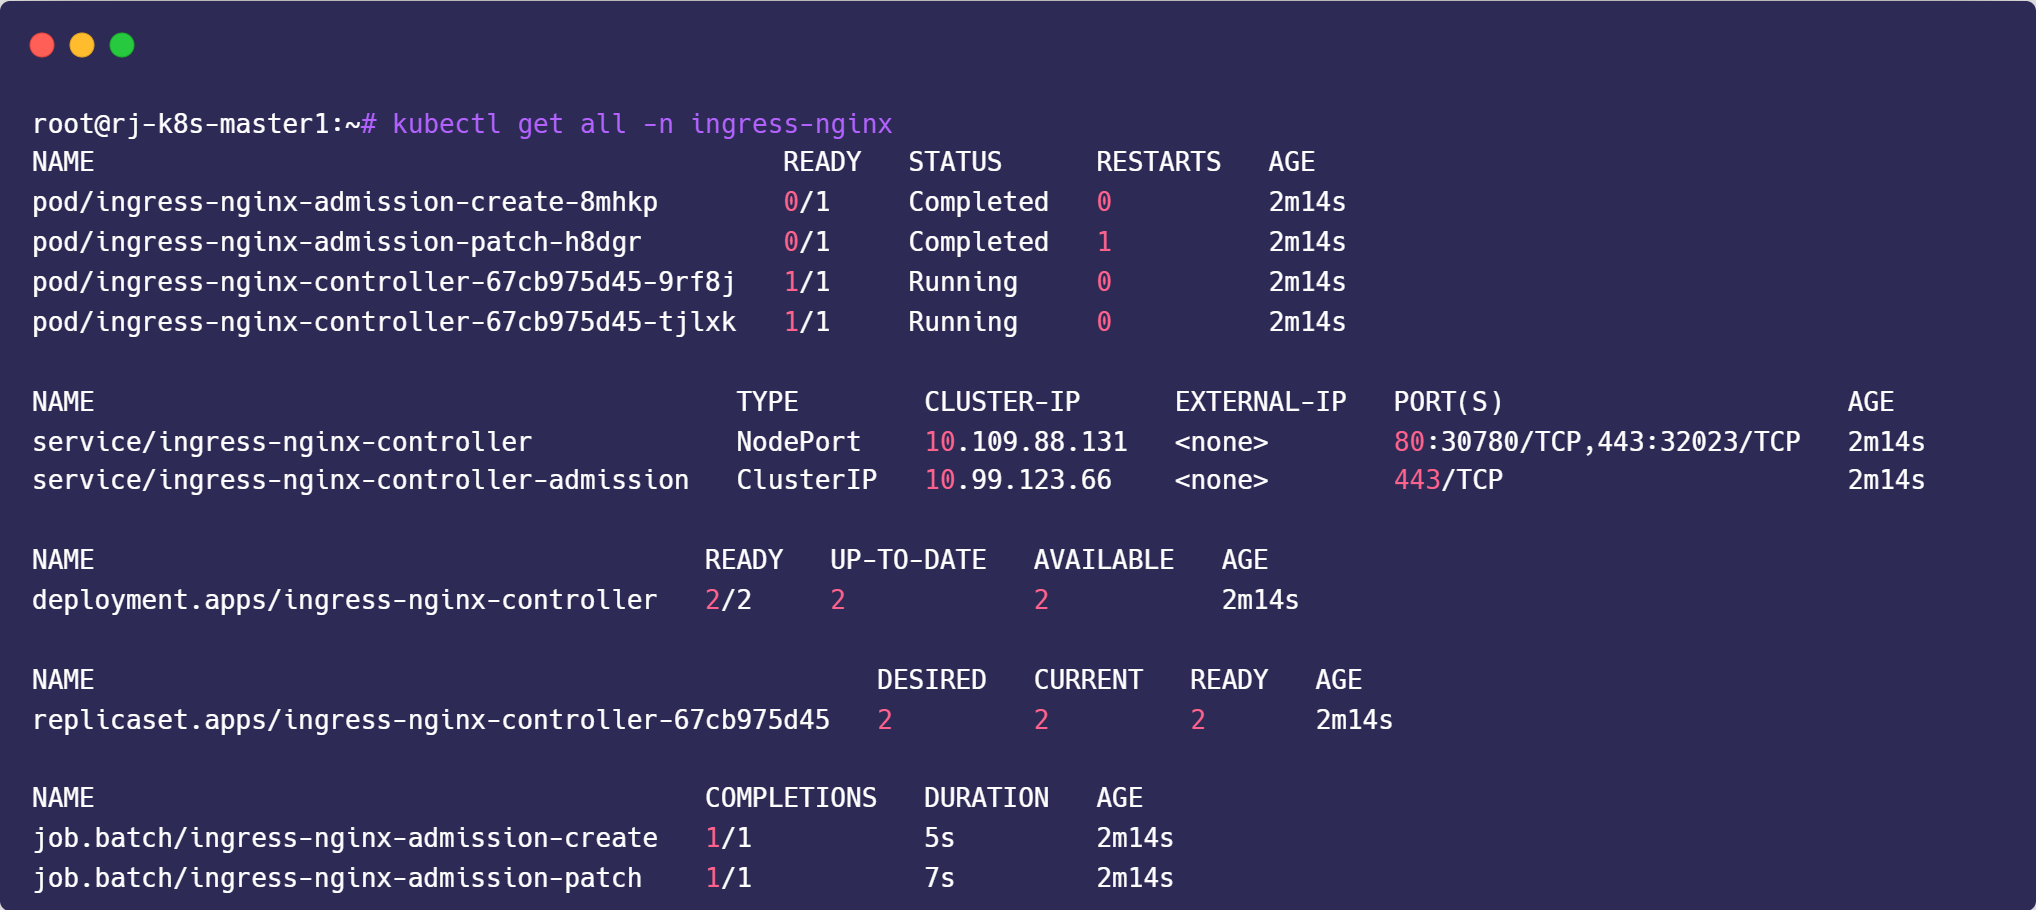
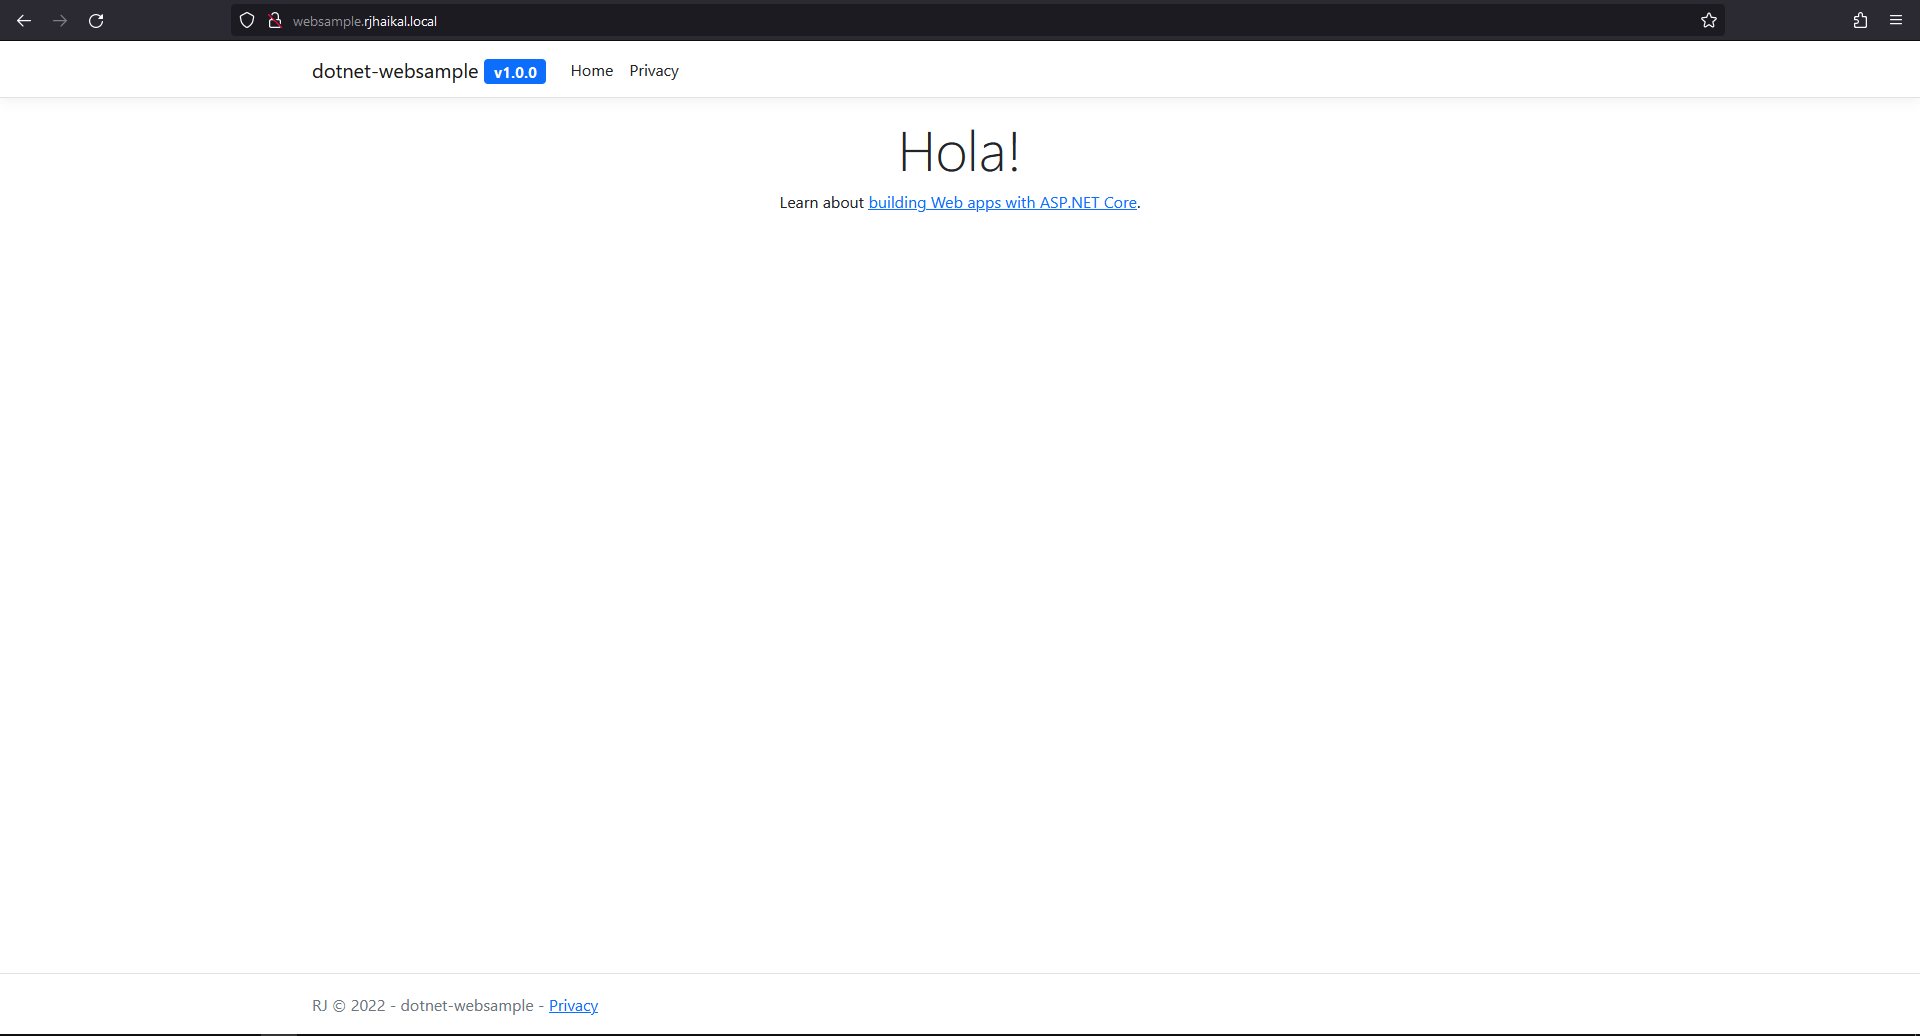
Operational Test
1. Download Manifest
git clone https://github.com/rjhaikal/dotnet-websample.git
cd dotnet-websample
cat manifests/deployment.yaml

---
apiVersion: apps/v1
kind: Deployment
metadata:
  labels:
    app: webproject
  name: webproject
spec:
  replicas: 3
  revisionHistoryLimit: 1
  selector:
    matchLabels:
      app: webproject
  template:
    metadata:
      labels:
        app: webproject
    spec:
      containers:
      - image: rjhaikal/dotnet-websample:v1.0.0
        imagePullPolicy: Always
        name: webproject
        ports:
        - containerPort: 80
          name: webproject
      terminationGracePeriodSeconds: 30
---
apiVersion: v1
kind: Service
metadata:
  labels:
    app: webproject
  name: webproject
spec:
  ports:
  - name: "webproject-service"
    port: 80
  selector:
    app: webproject
---
apiVersion: networking.k8s.io/v1
kind: Ingress
metadata:
  name: webproject-ingress
spec:
  ingressClassName: nginx
  rules:
    - host: websample.rjhaikal.local
      http:
        paths:
          - path: /
            pathType: Prefix
            backend:
              service:
                name: webproject
                port:
                  number: 80
2. Apply Manifest
kubectl create namespace websample
kubectl apply -f manifests/deployment.yaml -n websample
3. Verify
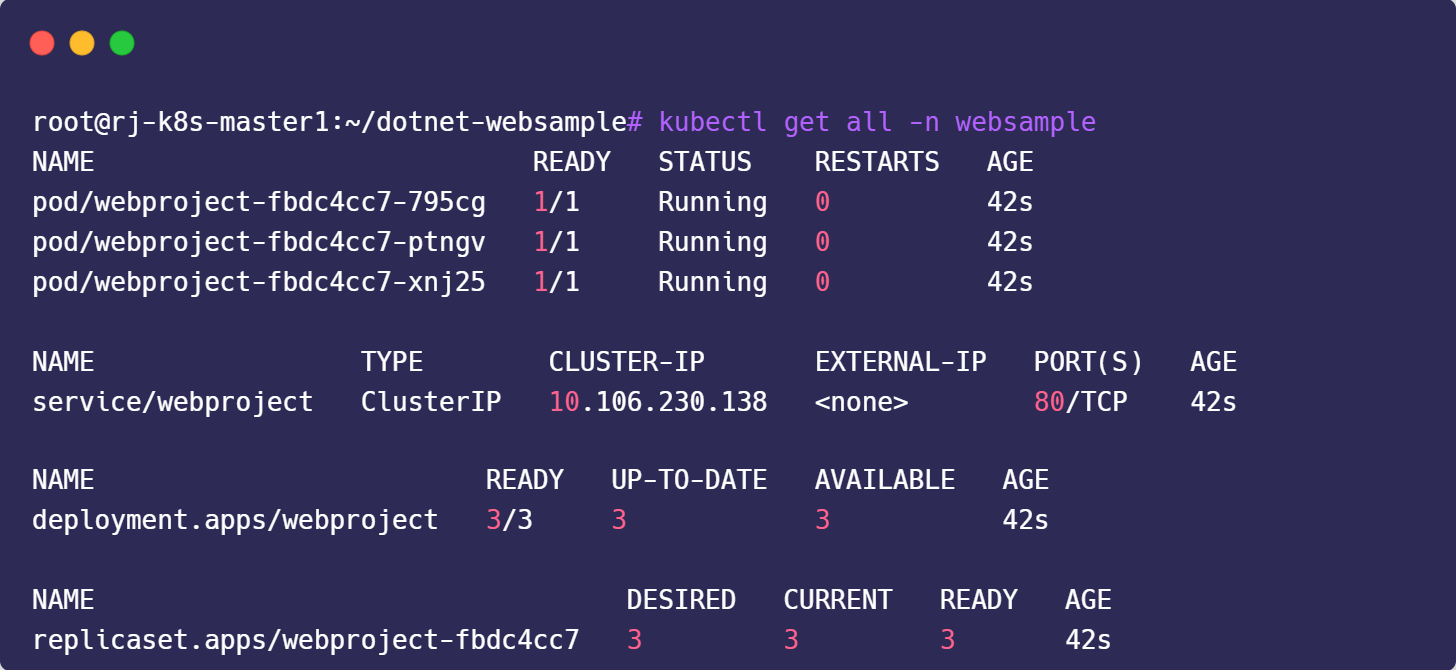

4. Add Ingress to /etc/hosts
vim /etc/hosts
---
10.20.10.101 rj-k8s-lb1 websample.rjhaikal.local
10.20.10.102 rj-k8s-lb2 websample.rjhaikal.local
---
Reference