This article is more like a note to myself, but this may help if you are looking at configuring Kolla Ansible All-in-One Openstack Zed.
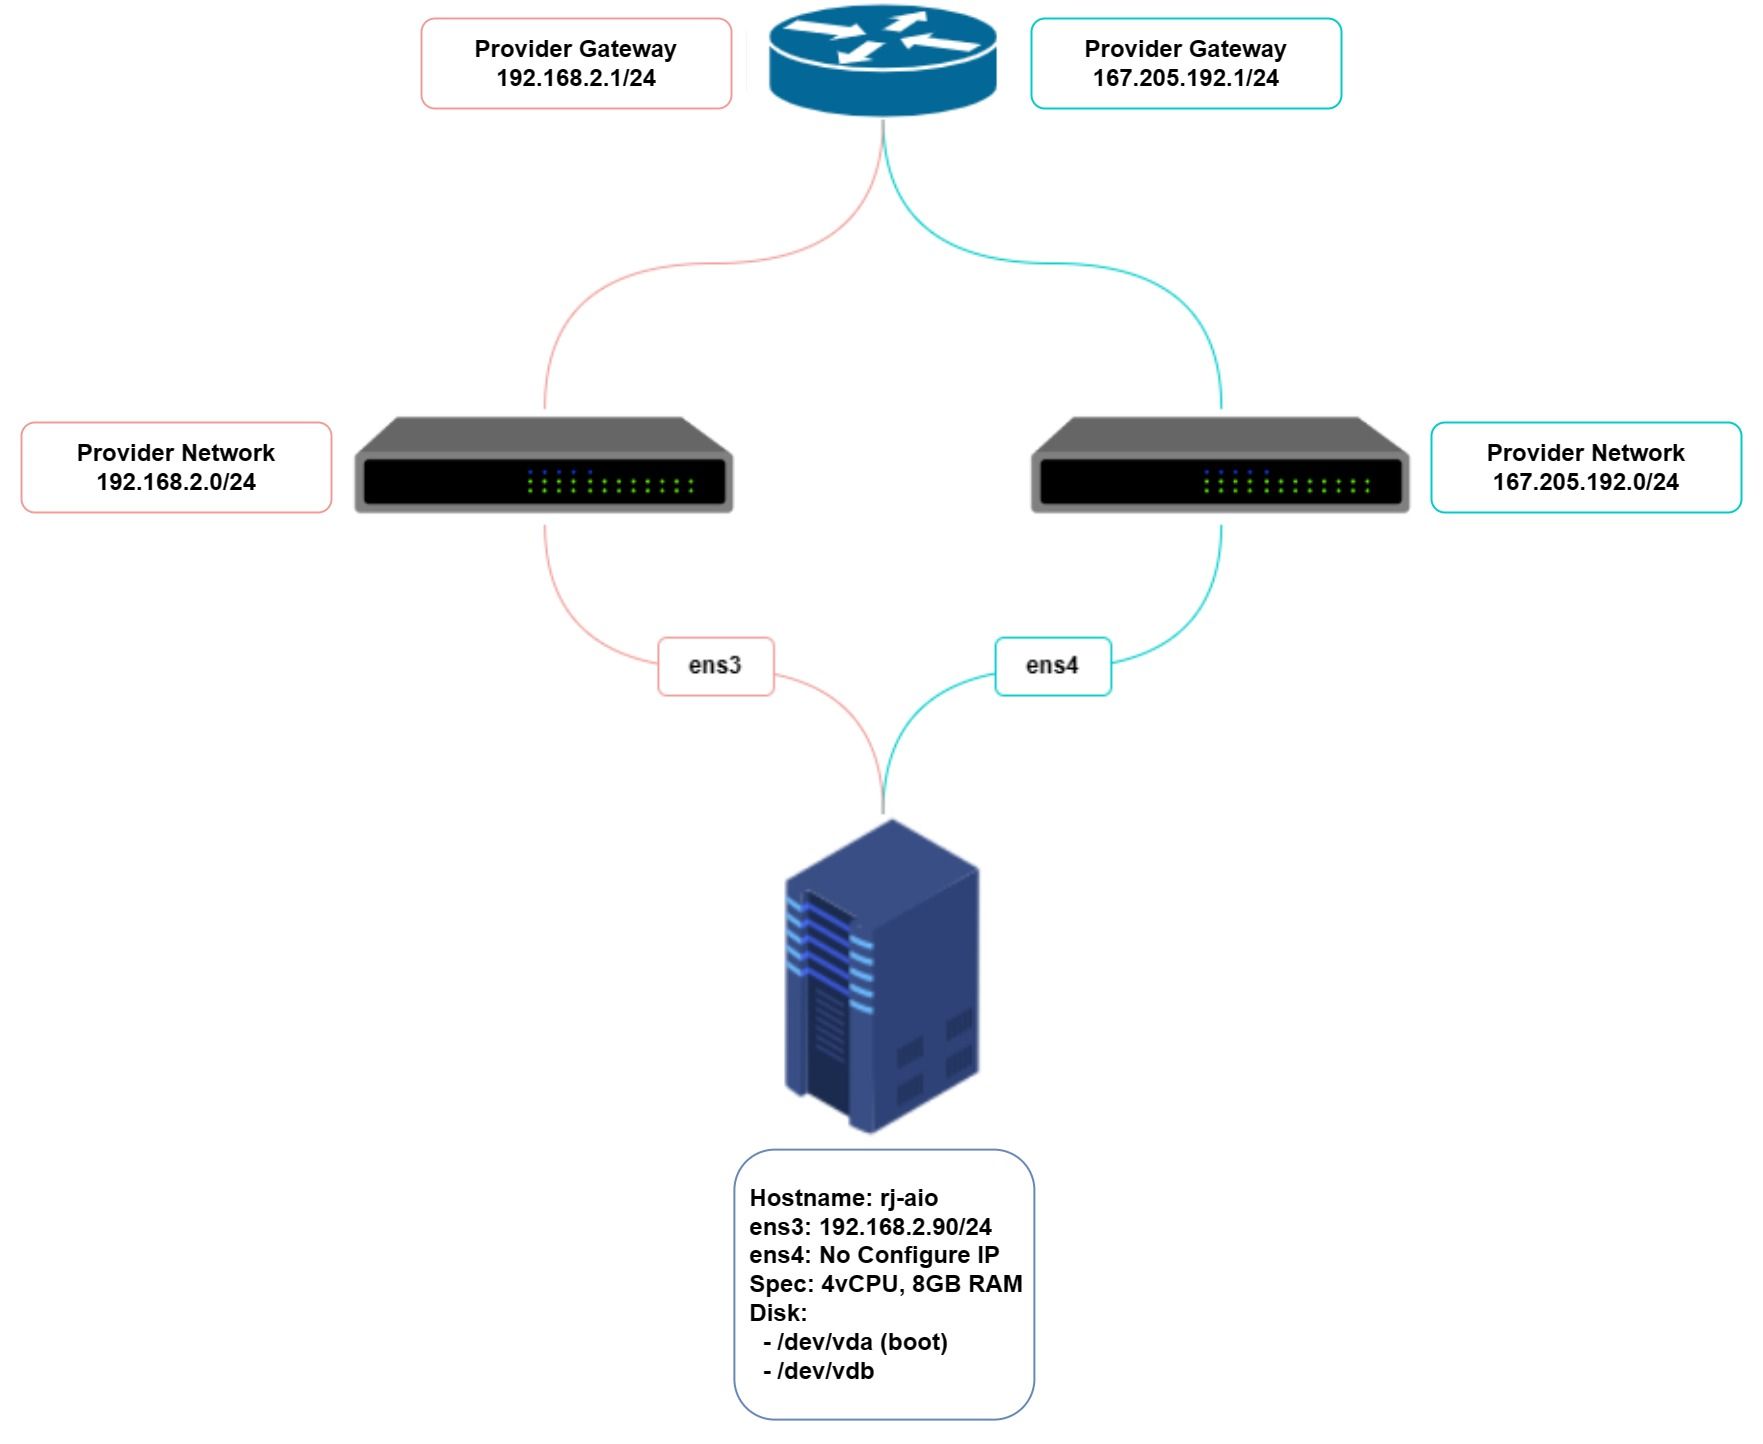
Diagram
System Spesifications
| Hostname | rj-aio |
|---|---|
| CPU | 4 vCPU |
| RAM | 8GB |
| DISK1 (system) | 40GB |
| DISK2 (cinder) | 40GB |
| Internal FQDN | openstack.rjhaikal.my.id |
IP Address
| Node | ens3 | ens4 | VIP |
|---|---|---|---|
| rj-aio | 192.168.2.90/24 | none | 192.168.2.100 |
Openstack Deployment with Kolla Ansible
Kolla Ansible Preparation
- Mapping Node Host
vim /etc/hosts
---
192.168.2.90 rj-aio
192.168.2.100 openstack.rjhaikal.my.id
---
2. Create swap partition
# Creating a file which will be used for swap:
sudo fallocate -l 4G /swapfile

# Only the root user should be able to write and read the swap file. Set the correct permissions by typing:
sudo chmod 600 /swapfile

# Use the mkswap utility to set up a Linux swap area on the file:
sudo mkswap /swapfile

# Activate the swap file using the following command:
sudo swapon /swapfile

# To make the change permanent open the /etc/fstab file. add to new line don't change anything already exist:
sudo nano /etc/fstab
---
/swapfile swap swap defaults 0 0
---

# Verify
sudo swapon --show
3. Install dependencies
sudo apt-get install -y git python3-dev libffi-dev gcc libssl-dev python3-venv python3-selinux python3-setuptools python3-pip python3-docker

pip3 install docker
4. Create a virtual environment and activate it
mkdir openstack && cd openstack
python3 -m venv os-venv
source os-venv/bin/activate
5. Install Ansible
pip install -U pip munch
pip install 'ansible>=4,<6'
6. Install Kolla Ansible
pip install git+https://opendev.org/openstack/kolla-ansible@stable/zed7. Install Ansible Galaxy dependencies (Zed release onwards)
kolla-ansible install-deps8. Create the /etc/kolla directory
sudo mkdir -p /etc/kolla
sudo chown $USER:$USER /etc/kolla
9. Copy globals.yml and passwords.yml to /etc/kolla directory
sudo cp -r os-venv/share/kolla-ansible/etc_examples/kolla/* /etc/kolla10. Copy all-in-one and multinode inventory files to the current directory
sudo cp os-venv/share/kolla-ansible/ansible/inventory/* .Kolla-Ansible comes with all-in-one and multinode example inventory files. The difference between them is that the former is ready for deploying single node OpenStack on localhost. If you need to use separate host or more than one node, edit multinode inventory
11. Configure ansible
sudo mkdir -p /etc/ansible
sudo vim /etc/ansible/ansible.cfg
[defaults]
host_key_checking=False
pipelining=True
forks=10012. Generate kolla password
kolla-genpwdPasswords used in our deployment are stored in /etc/kolla/passwords.yml file. All passwords are blank in this file and have to be filled either manually or by running random password generator
13. Configure our Openstack cluster on kolla globals.yml
vim /etc/kolla/globals.ymlglobals.yml
---
## BASE
#config_strategy: "COPY_ALWAYS"
kolla_base_distro: "ubuntu"
kolla_install_type: "source"
openstack_release: "zed"

## NETWORK
kolla_internal_vip_address: "192.168.2.100"
kolla_internal_fqdn: "openstack.rjhaikal.my.id"
network_interface: "ens3"
neutron_external_interface: "ens4"
neutron_plugin_agent: "ovn"
enable_neutron_provider_networks: "yes"

## SERVICE
nova_compute_virt_type: "qemu"
enable_haproxy: "yes"
enable_cinder: "yes"
enable_cinder_backup: "no"
enable_cinder_backend_lvm: "yes"
cinder_volume_group: "openstack_cinder"
keystone_token_provider: "fernet"
enable_keystone: "yes"
enable_horizon: "yes"
enable_openstack_core: "yes"

## TLS
kolla_enable_tls_internal: "yes"
kolla_enable_tls_external: "yes"
kolla_enable_tls_backend: "yes"
kolla_copy_ca_into_containers: "yes"
openstack_cacert: "/etc/ssl/certs/ca-certificates.crt"
kolla_copy_ca_into_containers: "yes"
kolla_verify_tls_backend: "no"
Cinder preparation
- Create Physical Volume (PV)
sudo pvcreate /dev/vdb2. Create Volume Group (VG)
sudo vgcreate openstack_cinder /dev/vdb3. Verify VG Created
sudo vgsDeploy Openstack Cluster
- Create session tmux
tmux new -s deploy
cd ~/openstack
source os-venv/bin/activate
2. Generate Kolla Certificates
kolla-ansible -i ./all-in-one certificates3. Bootstrap servers with kolla deploy dependencies
kolla-ansible -i ./all-in-one bootstrap-servers4. Do pre-deployment checks for hosts
kolla-ansible -i ./all-in-one prechecks5. Install proceed to actual OpenStack deployment
kolla-ansible -i ./all-in-one deploy6. Run post-deploy to generate openstack admin-openrc.sh
kolla-ansible -i ./all-in-one post-deploy7. Install openstack client
pip install openstackclient8. Copy & Edit admin-openrc.sh
# Copy admin-openrc.sh
cp /etc/kolla/admin-openrc.sh ~/openstack

# Edit admin-openrc.sh
vim ~/openstack/admin-openrc.sh
---
source /root/openstack/os-venv/bin/activate
# Ansible managed

# Clear any old environment that may conflict.
for key in $( set | awk '{FS="="}  /^OS_/ {print $1}' ); do unset $key ; done
export OS_PROJECT_DOMAIN_NAME=Default
export OS_USER_DOMAIN_NAME=Default
export OS_PROJECT_NAME=admin
export OS_TENANT_NAME=admin
export OS_USERNAME=admin
export OS_PASSWORD=<password>
export OS_AUTH_URL=https://openstack.rjhaikal.my.id:5000
export OS_INTERFACE=internal
export OS_ENDPOINT_TYPE=internalURL
export OS_IDENTITY_API_VERSION=3
export OS_REGION_NAME=RegionOne
export OS_AUTH_PLUGIN=password
export OS_CACERT=/etc/ssl/certs/ca-certificates.crt
---
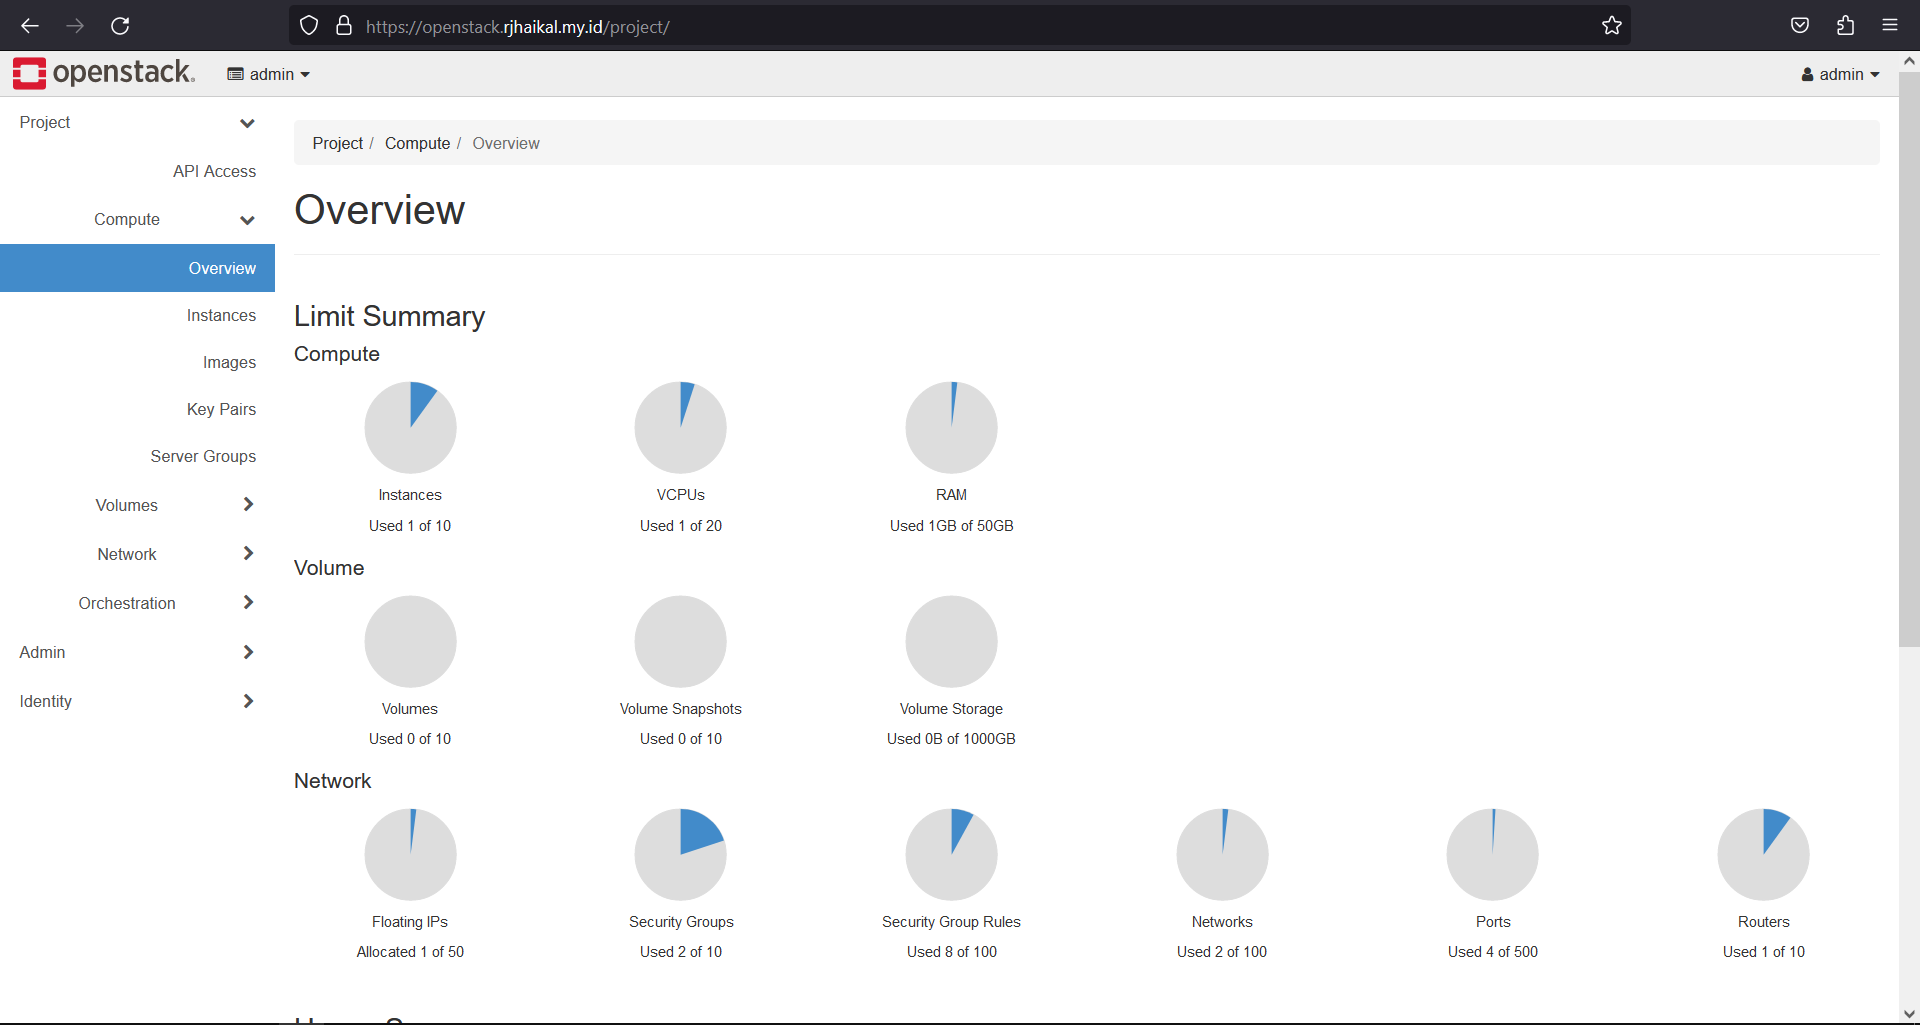
9. Verify Cluster
source /root/openstack/admin-openrc.sh
openstack endpoint list
+----------------------------------+-----------+--------------+----------------+---------+-----------+--------------------------------------------------------+
| ID                               | Region    | Service Name | Service Type   | Enabled | Interface | URL                                                    |
+----------------------------------+-----------+--------------+----------------+---------+-----------+--------------------------------------------------------+
| 3bf93b02d667472ab9695390d08a0b2b | RegionOne | keystone     | identity       | True    | public    | https://openstack.rjhaikal.my.id:5000                  |
| 56aa811e51b844df8ff8482aa412499b | RegionOne | cinderv3     | volumev3       | True    | public    | https://openstack.rjhaikal.my.id:8776/v3/%(tenant_id)s |
| 5a03ad648b194054a7757e3acba380dc | RegionOne | glance       | image          | True    | internal  | https://openstack.rjhaikal.my.id:9292                  |
| 75e3bab5029e423db320f162f394f64a | RegionOne | heat-cfn     | cloudformation | True    | public    | https://openstack.rjhaikal.my.id:8000/v1               |
| 8b28e7fadec248f58117c42506bacf62 | RegionOne | nova         | compute        | True    | public    | https://openstack.rjhaikal.my.id:8774/v2.1             |
| 8b88dd08e3054782a2ea8086bd83b1a6 | RegionOne | keystone     | identity       | True    | internal  | https://openstack.rjhaikal.my.id:5000                  |
| 90034fb149dc4d7eb9c9544295c3b246 | RegionOne | neutron      | network        | True    | internal  | https://openstack.rjhaikal.my.id:9696                  |
| ab8e513b8d544bdb90a6d4940d1a0988 | RegionOne | neutron      | network        | True    | public    | https://openstack.rjhaikal.my.id:9696                  |
| b77bb95ff0134b30a67fb9455c756870 | RegionOne | heat         | orchestration  | True    | internal  | https://openstack.rjhaikal.my.id:8004/v1/%(tenant_id)s |
| b9030bfd11044a3f9b62c98346613d7f | RegionOne | nova         | compute        | True    | internal  | https://openstack.rjhaikal.my.id:8774/v2.1             |
| baa5d5025911486a9f1181e986b64e66 | RegionOne | glance       | image          | True    | public    | https://openstack.rjhaikal.my.id:9292                  |
| c4a07d51caa748168ee2fb0a2a358ff6 | RegionOne | cinderv3     | volumev3       | True    | internal  | https://openstack.rjhaikal.my.id:8776/v3/%(tenant_id)s |
| e3bb86462904446a82da614cfe7d2cf1 | RegionOne | heat         | orchestration  | True    | public    | https://openstack.rjhaikal.my.id:8004/v1/%(tenant_id)s |
| e8108bc19ab04a8da497954b33954b97 | RegionOne | heat-cfn     | cloudformation | True    | internal  | https://openstack.rjhaikal.my.id:8000/v1               |
| e95c65664e0e46af95a3a947fdfef5b2 | RegionOne | placement    | placement      | True    | public    | https://openstack.rjhaikal.my.id:8780                  |
| e9785c737a644bec844a9dddd803ea7a | RegionOne | placement    | placement      | True    | internal  | https://openstack.rjhaikal.my.id:8780                  |
+----------------------------------+-----------+--------------+----------------+---------+-----------+--------------------------------------------------------+

openstack hypervisor list
+----+---------------------+-----------------+--------------+-------+
| ID | Hypervisor Hostname | Hypervisor Type | Host IP      | State |
+----+---------------------+-----------------+--------------+-------+
|  1 | rj-aio              | QEMU            | 192.168.2.90 | up    |
+----+---------------------+-----------------+--------------+-------+

openstack host list
+-----------+-----------+----------+
| Host Name | Service   | Zone     |
+-----------+-----------+----------+
| rj-aio    | conductor | internal |
| rj-aio    | compute   | nova     |
| rj-aio    | scheduler | internal |
+-----------+-----------+----------+

openstack network agent list
+--------------------------------------+------------------------------+--------+-------------------+-------+-------+----------------------------+
| ID                                   | Agent Type                   | Host   | Availability Zone | Alive | State | Binary                     |
+--------------------------------------+------------------------------+--------+-------------------+-------+-------+----------------------------+
| rj-aio                               | OVN Controller Gateway agent | rj-aio |                   | :-)   | UP    | ovn-controller             |
| ad26c278-1e19-5eab-bc84-050810860cac | OVN Metadata agent           | rj-aio |                   | :-)   | UP    | neutron-ovn-metadata-agent |
+--------------------------------------+------------------------------+--------+-------------------+-------+-------+----------------------------+

openstack volume service list
+------------------+--------------+------+---------+-------+----------------------------+
| Binary           | Host         | Zone | Status  | State | Updated At                 |
+------------------+--------------+------+---------+-------+----------------------------+
| cinder-scheduler | rj-aio       | nova | enabled | up    | 2023-02-16T08:12:10.000000 |
| cinder-volume    | rj-aio@lvm-1 | nova | enabled | up    | 2023-02-16T08:12:12.000000 |
+------------------+--------------+------+---------+-------+----------------------------+
Launch an Instance
1. Create Cirros Image
CirrOS is a minimal Linux distribution that was designed for use as a test image on clouds such as OpenStack Compute. You can download a CirrOS image in various formats from the CirrOS download page. If your deployment uses QEMU or KVM, we recommend using the images in qcow2 format.
# Download cirros cloud image version 0.6.1
wget http://download.cirros-cloud.net/0.6.1/cirros-0.6.1-x86_64-disk.img

# Create Cirros Image
openstack image create --disk-format qcow2 \
  --container-format bare --public \
  --file ./cirros-0.6.1-x86_64-disk.img cirros-0.6.1

# List Image
openstack image list
+--------------------------------------+--------------+--------+
| ID                                   | Name         | Status |
+--------------------------------------+--------------+--------+
| 57bbbf3c-ad78-43f8-9d1a-a9da086e15a4 | cirros-0.6.1 | active |
+--------------------------------------+--------------+--------+
If you want to use an image with another OS, you can refer to the following reference.
 Raja Haikal
2. Creating External Network
External network or it can also be called the provider network is a network connected to the existing layer-2 physical networks or VLANs in the datacenter.
The OpenStack user with a member role cannot create or configure the network topologies in the provider network. The provider network can only be set up by an OpenStack admin who has access to manage the actual physical networks in the datacenter. This is because configuring the provider network requires configuration changes in the physical network infrastructure level.
# Create External Network
openstack network create  --share --external \
  --provider-physical-network physnet1 \
  --provider-network-type flat external-net

# After the network is created, let's create a subnet for that network
openstack subnet create --network external-net \
  --gateway 167.205.192.1 --no-dhcp \
  --subnet-range 167.205.192.0/24 external-subnet

# Displays the existing network and subnet
openstack network list
+--------------------------------------+--------------+--------------------------------------+
| ID                                   | Name         | Subnets                              |
+--------------------------------------+--------------+--------------------------------------+
| e3b32abf-c163-4421-984b-25a13373827a | external-net | 2d86c9dd-d474-477d-a0d0-b5846c738d9c |
+--------------------------------------+--------------+--------------------------------------+

openstack subnet list
+--------------------------------------+-----------------+--------------------------------------+------------------+
| ID                                   | Name            | Network                              | Subnet           |
+--------------------------------------+-----------------+--------------------------------------+------------------+
| 2d86c9dd-d474-477d-a0d0-b5846c738d9c | external-subnet | e3b32abf-c163-4421-984b-25a13373827a | 167.205.192.0/24 |
+--------------------------------------+-----------------+--------------------------------------+------------------+
3. Create Internal Network
Internal network or it can be called self service network is a network enable the users with member role to create their own network topology within the user's tenant/project without involving OpenStack administrator's help.
The users can create as many virtual networks as they like (not exceeding the project quota limit), interconnected with virtual routers and connected to an external network. Also, self-service networks offer VxLAN/GRE encapsulation protocols; in that way, the user can create a private tunnel within your OpenStack nodes. This will allow the user to set up their own subnets and can be linked to the external or provider networks using an OpenStack router.
# Create Internal Network
openstack network create internal-net

# After the network is created, let's create a subnet for that network
openstack subnet create --network internal-net  \
  --allocation-pool start=172.16.10.10,end=172.16.10.254 \
  --dns-nameserver 8.8.8.8 --gateway  172.16.10.1 \
  --subnet-range 172.16.10.0/24 internal-subnet

# Displays the existing network and subnet
openstack network list
+--------------------------------------+--------------+--------------------------------------+
| ID                                   | Name         | Subnets                              |
+--------------------------------------+--------------+--------------------------------------+
| a428ea03-b6cb-44ba-aa5f-0b39efec47c6 | internal-net | 85cff304-a2a9-4237-88fc-07be2b3e9bb0 |
| e3b32abf-c163-4421-984b-25a13373827a | external-net | 2d86c9dd-d474-477d-a0d0-b5846c738d9c |
+--------------------------------------+--------------+--------------------------------------+

openstack subnet list
+--------------------------------------+-----------------+--------------------------------------+------------------+
| ID                                   | Name            | Network                              | Subnet           |
+--------------------------------------+-----------------+--------------------------------------+------------------+
| 2d86c9dd-d474-477d-a0d0-b5846c738d9c | external-subnet | e3b32abf-c163-4421-984b-25a13373827a | 167.205.192.0/24 |
| 85cff304-a2a9-4237-88fc-07be2b3e9bb0 | internal-subnet | a428ea03-b6cb-44ba-aa5f-0b39efec47c6 | 172.16.10.0/24   |
+--------------------------------------+-----------------+--------------------------------------+------------------+
4. Create Router
Routers enable the virtual layer-3 functionality, such as routing and Network Address Translation (NAT) between self-service (tenant network) and provider networks, or even between two different self-service networks belonging to the same project.
# Create Router
openstack router create rj-router

# After the router is made let's add the provider / external subnet to activate snat
openstack router set --external-gateway external-net rj-router

# Add the internal / self service subnet that was created previously into the router
openstack router add subnet rj-router internal-subnet

# Displays a list of routers in the project
openstack router list
+--------------------------------------+-----------+--------+-------+----------------------------------+
| ID                                   | Name      | Status | State | Project                          |
+--------------------------------------+-----------+--------+-------+----------------------------------+
| e73a926f-a2aa-49be-b9d3-5b2276af978e | rj-router | ACTIVE | UP    | e7459164891c4ceb99cc8fb842d55b00 |
+--------------------------------------+-----------+--------+-------+----------------------------------+
5. Create Security Group
Security groups provide virtual firewall rules that control inbound and outbound network traffic at the port level. Underneath, creating and managing the security group will write a proper IP tables rule in the compute node.
By default, each tenant has a default security group that allows all egress (outbound) traffic and denies all ingress (inbound) traffic. The default security group will be added to all virtual machines as a default setting. So, we need to change the rules in the default security group to allow inbound traffic to the virtual machines.
# Create Security Group
openstack security group create allow-ssh-icmp --description 'Allow SSH and ICMP'

# Add rule to the security group that was created earlier
openstack security group rule create --protocol icmp allow-ssh-icmp
openstack security group rule create --protocol tcp --ingress --dst-port 22 allow-ssh-icmp

# Displays a list of security group in the project
openstack security group list
+--------------------------------------+----------------+------------------------+----------------------------------+------+
| ID                                   | Name           | Description            | Project                          | Tags |
+--------------------------------------+----------------+------------------------+----------------------------------+------+
| 48c8e721-ddb8-4e1a-8c61-6ea8620a013c | default        | Default security group | e7459164891c4ceb99cc8fb842d55b00 | []   |
| f96e1909-f222-4839-b7ac-b82e02c13e20 | allow-ssh-icmp | Allow SSH and ICMP     | e7459164891c4ceb99cc8fb842d55b00 | []   |
+--------------------------------------+----------------+------------------------+----------------------------------+------+

# Displays a list of security group rule.
openstack security group rule list allow-ssh-icmp
+--------------------------------------+-------------+-----------+-----------+------------+-----------+-----------------------+----------------------+
| ID                                   | IP Protocol | Ethertype | IP Range  | Port Range | Direction | Remote Security Group | Remote Address Group |
+--------------------------------------+-------------+-----------+-----------+------------+-----------+-----------------------+----------------------+
| 03aff91e-51d7-4f09-8028-85391fda2014 | tcp         | IPv4      | 0.0.0.0/0 | 22:22      | ingress   | None                  | None                 |
| 0bf375b4-c5a0-40f4-86ff-b90a2d51509b | None        | IPv6      | ::/0      |            | egress    | None                  | None                 |
| 3b83a542-7f35-4587-89bf-bb8426f7f729 | None        | IPv4      | 0.0.0.0/0 |            | egress    | None                  | None                 |
| 6566f976-ea40-4752-98a0-fd293b1935d4 | icmp        | IPv4      | 0.0.0.0/0 |            | ingress   | None                  | None                 |
+--------------------------------------+-------------+-----------+-----------+------------+-----------+-----------------------+----------------------+
6. Create Keypair
When you launch a virtual machine, you can inject a keypair. Keypairs refers to SSH keypairs and consist of two elements a public key and a private key.
At least one key for each project can be created. Keypairs are used for access to our Linux hosts via SSH. The public portion of our keypair is injected into our instance at boot-time through a service known as cloud-init.
The Cloud-init can perform many tasks, one of which is managing this public keypair injection. Only this specific combination of the public and private key will allow us access to our instances.
# Import The Public Key of the Controller
openstack keypair create --public-key ~/.ssh/id_rsa.pub controller-key

# Displays a list of keypair that available of the current user (admin)
openstack keypair list
+----------------+-------------------------------------------------+------+
| Name           | Fingerprint                                     | Type |
+----------------+-------------------------------------------------+------+
| controller-key | 37:65:4b:21:77:b9:42:58:58:f7:2a:99:03:4c:54:12 | ssh  |
+----------------+-------------------------------------------------+------+
7. Create Flavor
Flavor describes the compute, memory, and storage capacity of an instance. Only admin privileged users can create, edit, and delete the flavor.
For Example we try to create a flavor with the following capacities
- Core : 1 vcpu
- RAM : 1024 MB
- DISK : 10GB
- Access : Public
# Create Flavor
openstack flavor create --ram 1024 --disk 10 --vcpus 1 --public small

# Displays a list of flavor
openstack flavor list
+--------------------------------------+-------+------+------+-----------+-------+-----------+
| ID                                   | Name  |  RAM | Disk | Ephemeral | VCPUs | Is Public |
+--------------------------------------+-------+------+------+-----------+-------+-----------+
| 91ce92ce-9d59-4a63-bee5-050b4af7fc9c | small | 1024 |   10 |         0 |     1 | True      |
+--------------------------------------+-------+------+------+-----------+-------+-----------+
8. Launching an Instance
# Launching an Instance
openstack server create --flavor small \
  --image cirros-0.6.1 \
  --key-name controller-key \
  --security-group allow-ssh-icmp \
  --network internal-net \
  cirros-instance

# Displays a list of instances in the project
openstack server list
+--------------------------------------+-----------------+--------+---------------------------+--------------+--------+
| ID                                   | Name            | Status | Networks                  | Image        | Flavor |
+--------------------------------------+-----------------+--------+---------------------------+--------------+--------+
| d5391020-8ea3-471b-b2eb-b7b22cf67a2c | cirros-instance | ACTIVE | internal-net=172.16.10.17 | cirros-0.6.1 | small  |
+--------------------------------------+-----------------+--------+---------------------------+--------------+--------+
9. Attach Floating IP
Floating IP in OpenStack networking is nothing but the IP range from the OpenStack external network to NAT with the virtual machines private IP.
When we create a new virtual machine in the private network, the VM will receive the private IP from the DHCP agent of the private network. To access the virtual machine from the external network, we need to SNAT the external network IP with the VM's private IP.
# Create a floating ip based on the range of the external network
openstack floating ip create --floating-ip-address 167.205.192.83 external-net
# Add the floating ip to the cirros instance
openstack server add floating ip cirros-instance 167.205.192.83
# Verify that the instance is attached to the floating IP.
openstack server list
+--------------------------------------+-----------------+--------+-------------------------------------------+--------------+--------+
| ID | Name | Status | Networks | Image | Flavor |
+--------------------------------------+-----------------+--------+-------------------------------------------+--------------+--------+
| d5391020-8ea3-471b-b2eb-b7b22cf67a2c | cirros-instance | ACTIVE | internal-net=167.205.192.83, 172.16.10.17 | cirros-0.6.1 | small |
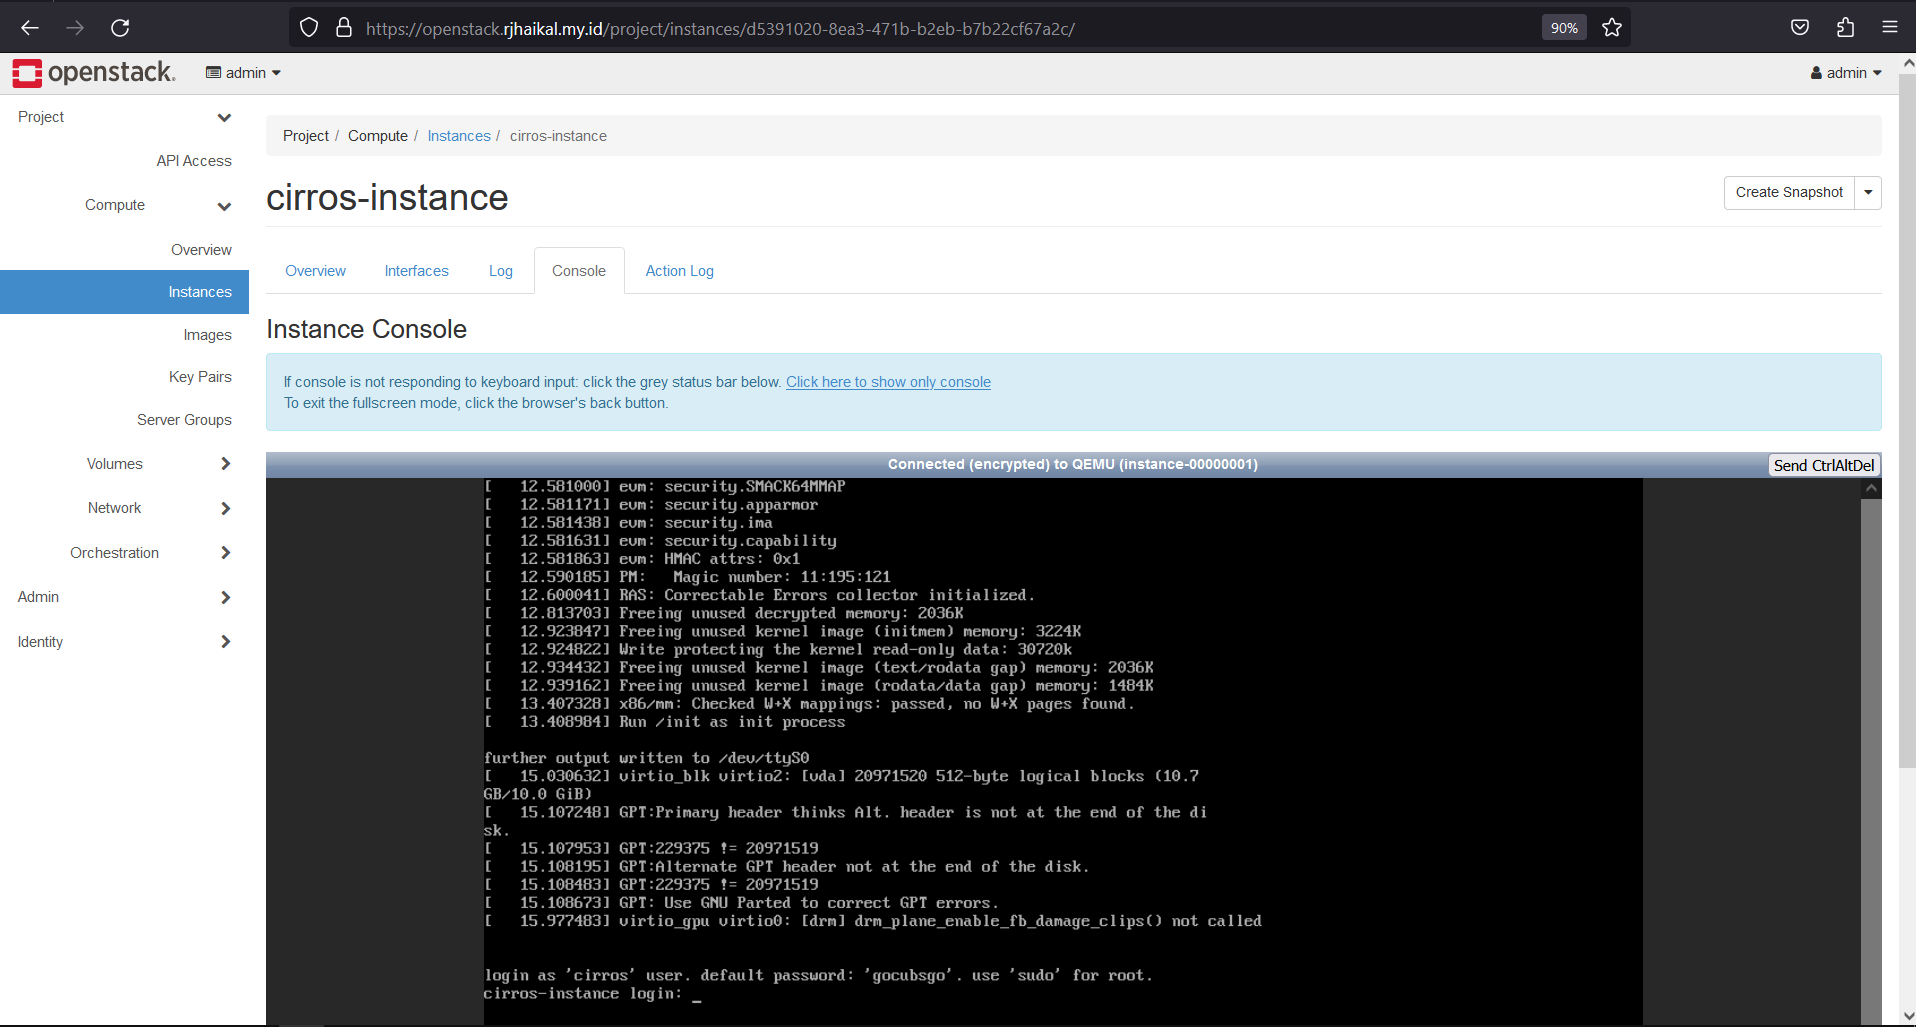
+--------------------------------------+-----------------+--------+-------------------------------------------+--------------+--------+10. Access Cirros Instance
# Ping Instance
ping -c3 167.205.192.83
PING 167.205.192.83 (167.205.192.83) 56(84) bytes of data.
64 bytes from 167.205.192.83: icmp_seq=1 ttl=62 time=5.77 ms
64 bytes from 167.205.192.83: icmp_seq=2 ttl=62 time=2.09 ms
64 bytes from 167.205.192.83: icmp_seq=3 ttl=62 time=1.19 ms

--- 167.205.192.83 ping statistics ---
3 packets transmitted, 3 received, 0% packet loss, time 2003ms
rtt min/avg/max/mdev = 1.192/3.016/5.770/1.981 ms

# SSH to Instance
ssh [email protected]
The authenticity of host '167.205.192.83 (167.205.192.83)' can't be established.
ECDSA key fingerprint is SHA256:u5CTX1q1J7NJq5aIrZEJm6EamuBzYhC//su67I91Mgw.
Are you sure you want to continue connecting (yes/no/[fingerprint])? yes
Warning: Permanently added '167.205.192.83' (ECDSA) to the list of known hosts.
$

# Verify connection internet
ping -c3 google.com
PING 172.217.23.110 (172.217.23.110) 56(84) bytes of data.
64 bytes from fra16s45-in-f14.1e100.net (172.217.23.110): icmp_seq=1 ttl=111 time=3.86 ms
64 bytes from mil04s23-in-f14.1e100.net (172.217.23.110): icmp_seq=2 ttl=111 time=3.15 ms
64 bytes from fra16s45-in-f14.1e100.net (172.217.23.110): icmp_seq=3 ttl=111 time=2.72 ms

--- 172.217.23.110 ping statistics ---
3 packets transmitted, 3 received, 0% packet loss, time 2005ms
rtt min/avg/max/mdev = 2.717/3.244/3.861/0.471 ms
Horizon