No matter the size of your Kubernetes environment, whether you're managing a single cluster or dozens, at some point you'll need to securely store sensitive information like passwords, secrets, or API keys for your containerized applications.
Since Kubernetes Secrets are stored as Base64-encoded plain text in Etcd (the Kubernetes data store), many engineers turn to third-party solutions for better security.
Vault is a tool designed to securely manage access to sensitive information, referred to as "secrets," which can include API keys, passwords, or certificates. It provides a centralized interface to handle any secret, ensures strict access control, and generates comprehensive audit logs to monitor secret usage.
In modern systems, numerous secrets are required—such as database credentials, API keys for external services, and communication credentials for service-oriented architectures. Tracking who is accessing which secret is already a challenge, especially when managing multiple platforms. Furthermore, handling tasks like key rotation, secure storage, and generating detailed audit logs becomes nearly impossible without a tailored solution. Vault is designed to address these complexities.
The key features of Vault are:
- Secure Secret Storage: Arbitrary key/value secrets can be stored in Vault. Vault encrypts these secrets prior to writing them to persistent storage, so gaining access to the raw storage isn't enough to access your secrets. Vault can write to disk, Consul, and more.
- Dynamic Secrets: Vault can dynamically generate secrets for services like AWS or SQL databases on demand. For instance, when an application needs access to an S3 bucket, Vault generates an AWS keypair with the necessary permissions. These dynamic secrets are automatically revoked once their lease expires.
- Data Encryption: Vault can encrypt and decrypt data without needing to store it. This gives security teams control over encryption policies while allowing developers to store encrypted data in external systems, such as SQL databases, without having to create custom encryption solutions.
- Leasing and Renewal: Every secret in Vault has an associated lease. Once the lease period ends, Vault automatically revokes the secret. Clients can renew their leases through Vault’s built-in renew APIs.
- Revocation: Vault supports automatic revocation of secrets, including individual secrets or groups of secrets (e.g., all secrets accessed by a specific user or of a particular type). This feature helps with key rotation and system lockdown in case of a security breach.
Architecture Diagram

System Requirements
1. Hashicorp Vault Nodes
| Component | Description |
|---|---|
| Number of VMs | 3 |
| CPU | 2 Cores |
| Memory | 4 GB |
| Disk | 20 GB |
| OS | Rocky Linux 9 |
| File System | XFS |
| Privileges | Root access preferred |
2. IP Allocation
| Component | Description |
|---|---|
| VM IPs | 192.168.11.101 - 192.168.11.103 |
| Virtual IP | 192.168.10.100 |
3. DNS Entries
| IP | Hostname | FQDN |
|---|---|---|
| 192.168.11.100 | - | rj-vault.rjhaikal.my.id |
| 192.168.11.101 | rj-vault-node1 | rj-vault-node1.rjhaikal.my.id |
| 192.168.11.102 | rj-vault-node2 | rj-vault-node2.rjhaikal.my.id |
| 192.168.11.103 | rj-vault-node3 | rj-vault-node3.rjhaikal.my.id |
4. AWS KMS Information
| Component | Description |
|---|---|
| AWS_ACCESS_KEY_ID | $AWS_ACCESS_KEY_ID |
| AWS_SECRET_ACCESS_KEY | $AWS_SECRET_ACCESS_KEY |
| AWS_REGION | us-east-1 |
| KMS_KEY_ID | 1fc3ac51-5469-49a1-b007-7786276176f0 |
Install and Configure a Hashicorp Vault HA Cluster
1. Prerequisites on All Nodes
Install Prerequisites
# Update and Upgrade packages
sudo yum update -y ; yum upgrade -y

# Install prerequisites
sudo yum install -y vim unzip curl chrony net-tools yum-utils
Synchronize server time with default NTP servers.
# Set timezone to Asia/Jakarta
sudo timedatectl set-timezone Asia/Jakarta

# Enable NTP time synchronization
sudo timedatectl set-ntp true
Start and enable chronyd service.
# Start and enable chronyd service
sudo systemctl enable --now chronyd

# Verify if the service is started
sudo systemctl status chronyd
Disable File Access Time Logging and enable Combat Fragmentation to enhance XFS file system performance. Add noatime,nodiratime,allocsize=64m to all XFS volumes under /etc/fstab.
# Edit /etc/fstab
sudo vim /etc/fstab

# Modify XFS volume entries as follows
# Example:
UUID=4814451b-2177-4679-bda1-e10797d12ae8 / xfs defaults,noatime,nodiratime,allocsize=64m 0 0
Optimizing the system for robust security and handling high concurrency.
cat <<"EOF" | sudo tee /etc/sysctl.d/00-sysctl.conf > /dev/null
# Default: 30
# 0 - Never swap under any circumstances.
# 1 - Do not swap unless there is an out-of-memory (OOM) condition.
vm.swappiness = 30

# vm.dirty_background_ratio is used to adjust how the kernel handles dirty pages that must be flushed to disk.
# Default value is 10.
# The value is a percentage of the total amount of system memory, and setting this value to 5 is appropriate in many situations.
# This setting should not be set to zero.
vm.dirty_background_ratio = 5

# The total number of dirty pages that are allowed before the kernel forces synchronous operations to flush them to disk
# can also be increased by changing the value of vm.dirty_ratio, increasing it to above the default of 30 (also a percentage of total system memory)
# vm.dirty_ratio value in-between 60 and 80 is a reasonable number.
vm.dirty_ratio = 60

# vm.max_map_count will calculate the current number of memory-mapped files.
# The minimum value for mmap limit (vm.max_map_count) is the number of open files ulimit (cat /proc/sys/fs/file-max).
# map_count should be around 1 per 128 KB of system memory. Therefore, max_map_count will be 262144 on a 32 GB system.
# Reference: https://docs.confluent.io/current/kafka/deployment.html
# Default: 65530
vm.max_map_count = 2097152

# Increases the size of file descriptors and inode cache and restricts core dumps.
fs.file-max = 2097152
fs.suid_dumpable = 0

# Default amount of memory allocated for the send and receive buffers for each socket.
# This will significantly increase performance for large transfers.
net.core.wmem_default = 25165824
net.core.rmem_default = 25165824

# Maximum amount of memory allocated for the send and receive buffers for each socket.
# This will significantly increase performance for large transfers.
net.core.wmem_max = 25165824
net.core.rmem_max = 25165824

# In addition to the socket settings, the send and receive buffer sizes for
# TCP sockets must be set separately using the net.ipv4.tcp_wmem and net.ipv4.tcp_rmem parameters.
# These are set using three space-separated integers that specify the minimum, default, and maximum sizes, respectively.
# The maximum size cannot be larger than the values specified for all sockets using net.core.wmem_max and net.core.rmem_max.
# A reasonable setting is a 4 KiB minimum, 64 KiB default, and 2 MiB maximum buffer.
net.ipv4.tcp_wmem = 20480 12582912 25165824
net.ipv4.tcp_rmem = 20480 12582912 25165824

# Increase the maximum total buffer-space allocatable
# This is measured in units of pages (4096 bytes)
net.ipv4.tcp_mem = 65536 25165824 262144
net.ipv4.udp_mem = 65536 25165824 262144

# Minimum amount of memory allocated for the send and receive buffers for each socket.
net.ipv4.udp_wmem_min = 16384
net.ipv4.udp_rmem_min = 16384

# Enabling TCP window scaling by setting net.ipv4.tcp_window_scaling to 1 will allow
# clients to transfer data more efficiently, and allow that data to be buffered on the broker side.
net.ipv4.tcp_window_scaling = 1

# Increasing the value of net.ipv4.tcp_max_syn_backlog above the default of 1024 will allow
# a greater number of simultaneous connections to be accepted.
net.ipv4.tcp_max_syn_backlog = 10240

# Increasing the value of net.core.netdev_max_backlog to greater than the default of 1000
# can assist with bursts of network traffic, specifically when using multigigabit network connection speeds,
# by allowing more packets to be queued for the kernel to process them.
net.core.netdev_max_backlog = 65536

# Increase the maximum amount of option memory buffers
net.core.optmem_max = 25165824

# Number of times SYNACKs for passive TCP connection.
net.ipv4.tcp_synack_retries = 2

# Allowed local port range.
net.ipv4.ip_local_port_range = 2048 65535

# Protect Against TCP Time-Wait
# Default: net.ipv4.tcp_rfc1337 = 0
net.ipv4.tcp_rfc1337 = 1

# Decrease the time default value for tcp_fin_timeout connection
net.ipv4.tcp_fin_timeout = 15

# The maximum number of backlogged sockets.
# Default is 128.
net.core.somaxconn = 4096

# Turn on syncookies for SYN flood attack protection.
net.ipv4.tcp_syncookies = 1

# Avoid a smurf attack
net.ipv4.icmp_echo_ignore_broadcasts = 1

# Turn on protection for bad icmp error messages
net.ipv4.icmp_ignore_bogus_error_responses = 1

# Enable automatic window scaling.
# This will allow the TCP buffer to grow beyond its usual maximum of 64K if the latency justifies it.
net.ipv4.tcp_window_scaling = 1

# Turn on and log spoofed, source routed, and redirect packets
net.ipv4.conf.all.log_martians = 1
net.ipv4.conf.default.log_martians = 1

# Tells the kernel how many TCP sockets that are not attached to any
# user file handle to maintain. In case this number is exceeded,
# orphaned connections are immediately reset and a warning is printed.
# Default: net.ipv4.tcp_max_orphans = 65536
net.ipv4.tcp_max_orphans = 65536

# Do not cache metrics on closing connections
net.ipv4.tcp_no_metrics_save = 1

# Enable timestamps as defined in RFC1323:
# Default: net.ipv4.tcp_timestamps = 1
net.ipv4.tcp_timestamps = 1

# Enable select acknowledgments.
# Default: net.ipv4.tcp_sack = 1
net.ipv4.tcp_sack = 1

# Increase the tcp-time-wait buckets pool size to prevent simple DOS attacks.
# net.ipv4.tcp_tw_recycle has been removed from Linux 4.12. Use net.ipv4.tcp_tw_reuse instead.
net.ipv4.tcp_max_tw_buckets = 1440000
net.ipv4.tcp_tw_reuse = 1

# The accept_source_route option causes network interfaces to accept packets with the Strict Source Route (SSR) or Loose Source Routing (LSR) option set.
# The following setting will drop packets with the SSR or LSR option set.
net.ipv4.conf.all.accept_source_route = 0
net.ipv4.conf.default.accept_source_route = 0

# Turn on reverse path filtering
net.ipv4.conf.all.rp_filter = 1
net.ipv4.conf.default.rp_filter = 1

# Disable ICMP redirect acceptance
net.ipv4.conf.all.accept_redirects = 0
net.ipv4.conf.default.accept_redirects = 0
net.ipv4.conf.all.secure_redirects = 0
net.ipv4.conf.default.secure_redirects = 0

# Disables sending of all IPv4 ICMP redirected packets.
net.ipv4.conf.all.send_redirects = 0
net.ipv4.conf.default.send_redirects = 0

# Enable IP forwarding.
# IP forwarding is the ability for an operating system to accept incoming network packets on one interface
net.ipv4.ip_forward = 1

# Disable IPv6
net.ipv6.conf.all.disable_ipv6 = 1
net.ipv6.conf.default.disable_ipv6 = 1

# Address Space Layout Randomization (ASLR) is a memory-protection process for operating systems that guards against buffer-overflow attacks.
# It helps to ensure that the memory addresses associated with running processes on systems are not predictable,
# thus flaws or vulnerabilities associated with these processes will be more difficult to exploit.
# Accepted values: 0 = Disabled, 1 = Conservative Randomization, 2 = Full Randomization
kernel.randomize_va_space = 2

# Allow for more PIDs (to reduce rollover problems)
kernel.pid_max = 65536
EOF
Reload all sysctl variables without rebooting the server.
sudo sysctl -p /etc/sysctl.d/00-sysctl.confSetup FQDN.
# Edit /etc/hosts
vim /etc/hosts

# Setup FQDN
192.168.11.100 rj-vault.rjhaikal.my.id
192.168.11.101 rj-vault-node1 rj-vault-node1.rjhaikal.my.id
192.168.11.102 rj-vault-node2 rj-vault-node2.rjhaikal.my.id
192.168.11.103 rj-vault-node3 rj-vault-node3.rjhaikal.my.id
reboot
sudo reboot2. Hashicorp Vault Basic Configuration on All Nodes
Configure YUM repository for Vault.
# Configure YUM repository
sudo yum-config-manager --add-repo https://rpm.releases.hashicorp.com/RHEL/hashicorp.repo
Install Vault.
# Install HashiCorp Vault
sudo yum -y install vault
Enable command auto-completion.
# Enable command auto-completion
vault -autocomplete-install

complete -C /usr/bin/vault vault
Setup Wildcard Certificate
# Install Dependencies
sudo yum install -y epel-release
sudo yum install -y certbot python3-certbot-dns-cloudflare

# Create secrets directory
mkdir ~/.secrets/
touch ~/.secrets/cloudflare.ini
sudo chmod 0700 ~/.secrets/
sudo chmod 0400 ~/.secrets/cloudflare.ini

# Store API Token
cat<<EOF > ~/.secrets/cloudflare.ini
dns_cloudflare_api_token = <YOUR_API_TOKEN>
EOF

# Request Wildcard Certificate
sudo certbot certonly --dns-cloudflare --dns-cloudflare-credentials ~/.secrets/cloudflare.ini -d *.rjhaikal.my.id --preferred-challenges dns-01
Copy the correct SSL certificate, and SSL key files under /opt/vault/tls
# Copy the correct TLS certificate and TLS key
/opt/vault/tls/fullchain.pem
/opt/vault/tls/privkey.pem

# Set correct permissions
sudo chown -R vault:vault /opt/vault/tls
sudo chmod 0600 /opt/vault/tls/*

# Restore SELinux context
sudo restorecon -RvF /opt/vault/tls

# If you are using a self-signed certificate, make sure to configure it as a trusted root certificate
sudo cp /opt/vault/tls/ca.pem /etc/pki/ca-trust/source/anchors/ca.pem
sudo update-ca-trust
Open necessary firewall ports.
sudo firewall-cmd --permanent --add-port={8200,8201}/tcp
sudo firewall-cmd --reload
Configure AWS KMS Auto Unseal
# Create an AWS Role with the following policy
{
	"Version": "2012-10-17",
	"Statement": [
		{
			"Sid": "Statement1",
			"Effect": "Allow",
			"Action": [
				"kms:Decrypt",
				"kms:Encrypt",
				"kms:DescribeKey"
			],
			"Resource": [
			    "arn:aws:kms:us-east-1:741448959034:key/1fc3ac51-5469-49a1-b007-7786276176f0"
			]
		}
	]
}# Create an IAM User with the following policy
{
"Version": "2012-10-17",
"Statement": [
{
"Sid": "Statement1",
"Effect": "Allow",
"Action": [
"kms:Decrypt",
"kms:Encrypt",
"kms:DescribeKey"
],
"Resource": [
"arn:aws:kms:us-east-1:741448959034:key/1fc3ac51-5469-49a1-b007-7786276176f0"
]
}
]
}3. Configurations on rj-vault-node1
Add the configurations under /etc/vault.d/vault.hcl
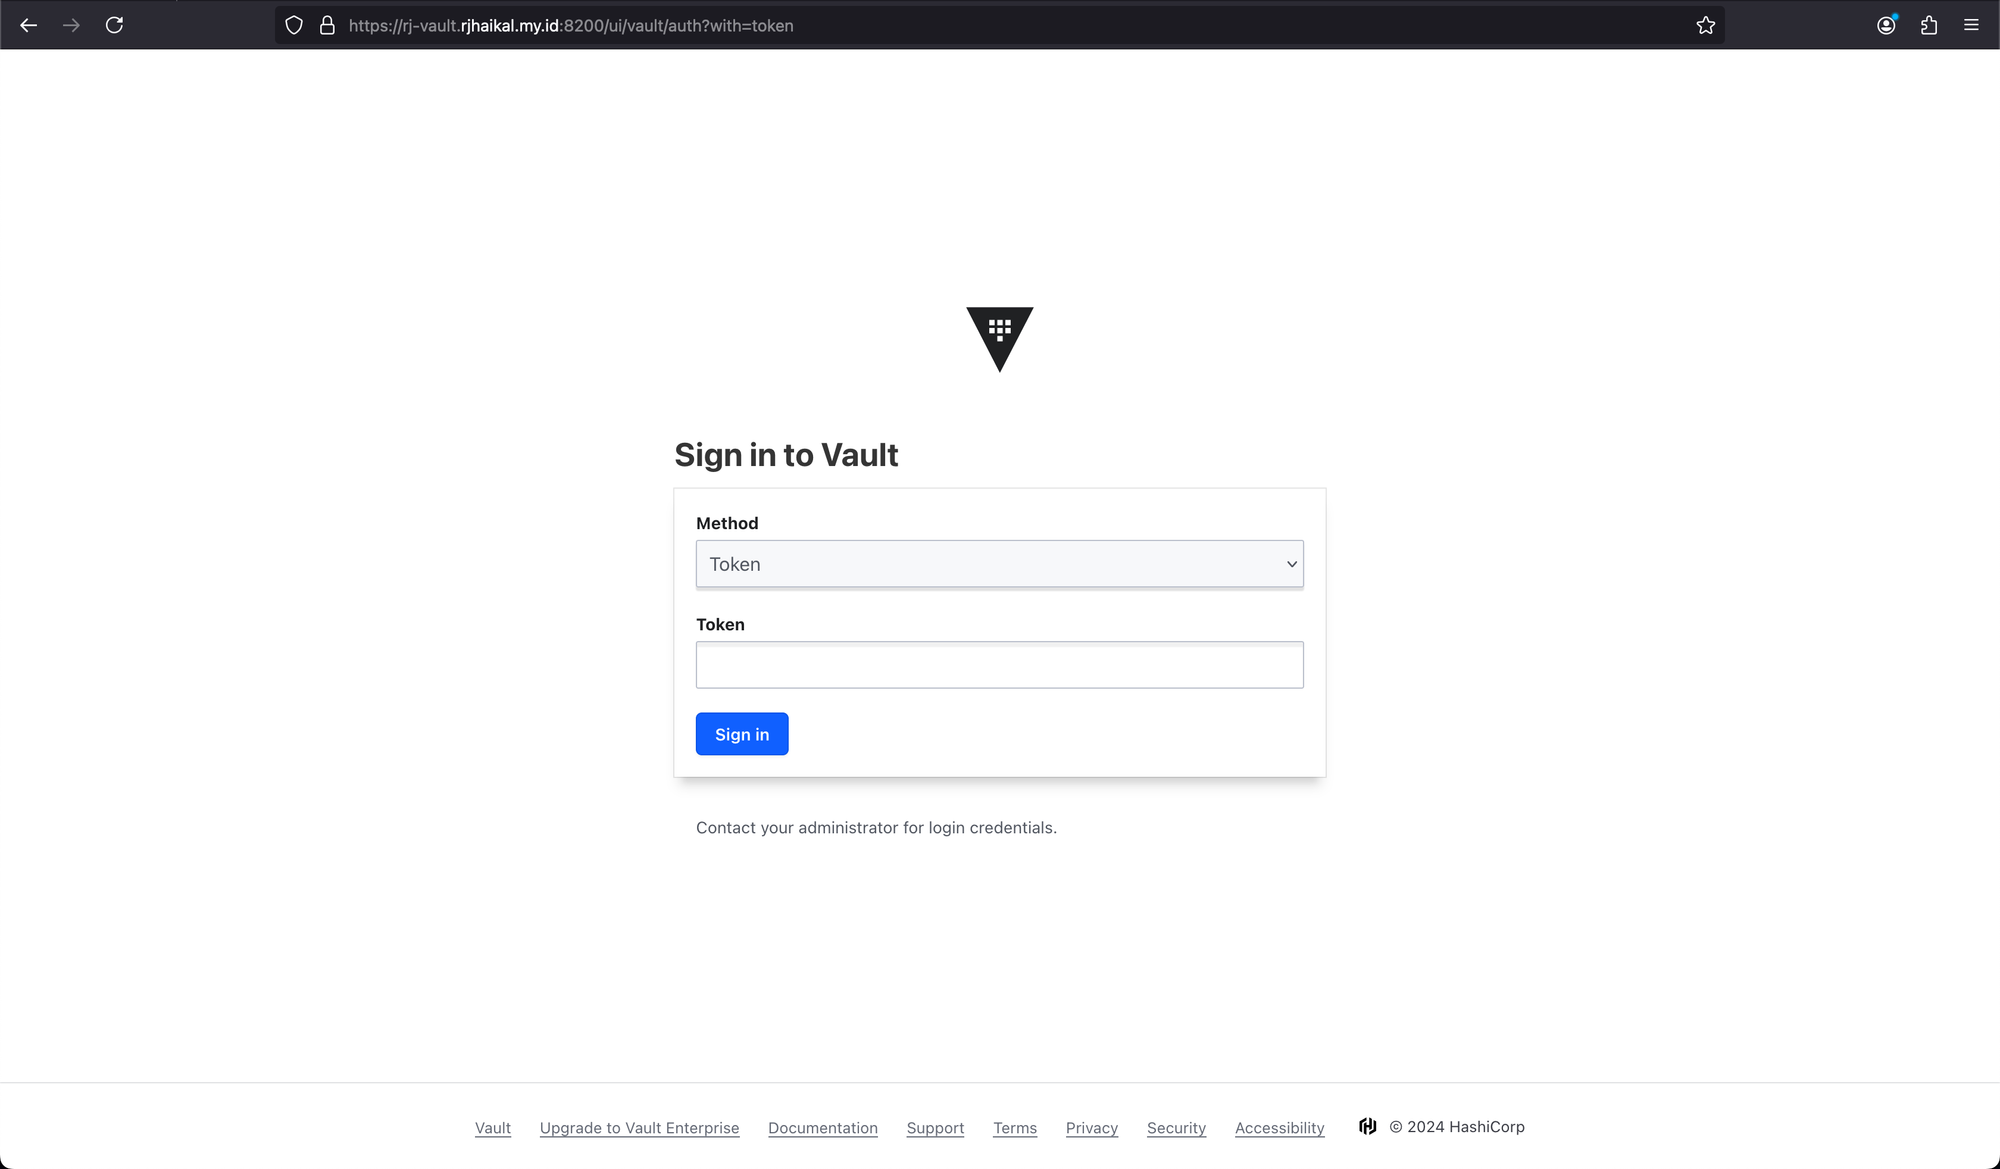
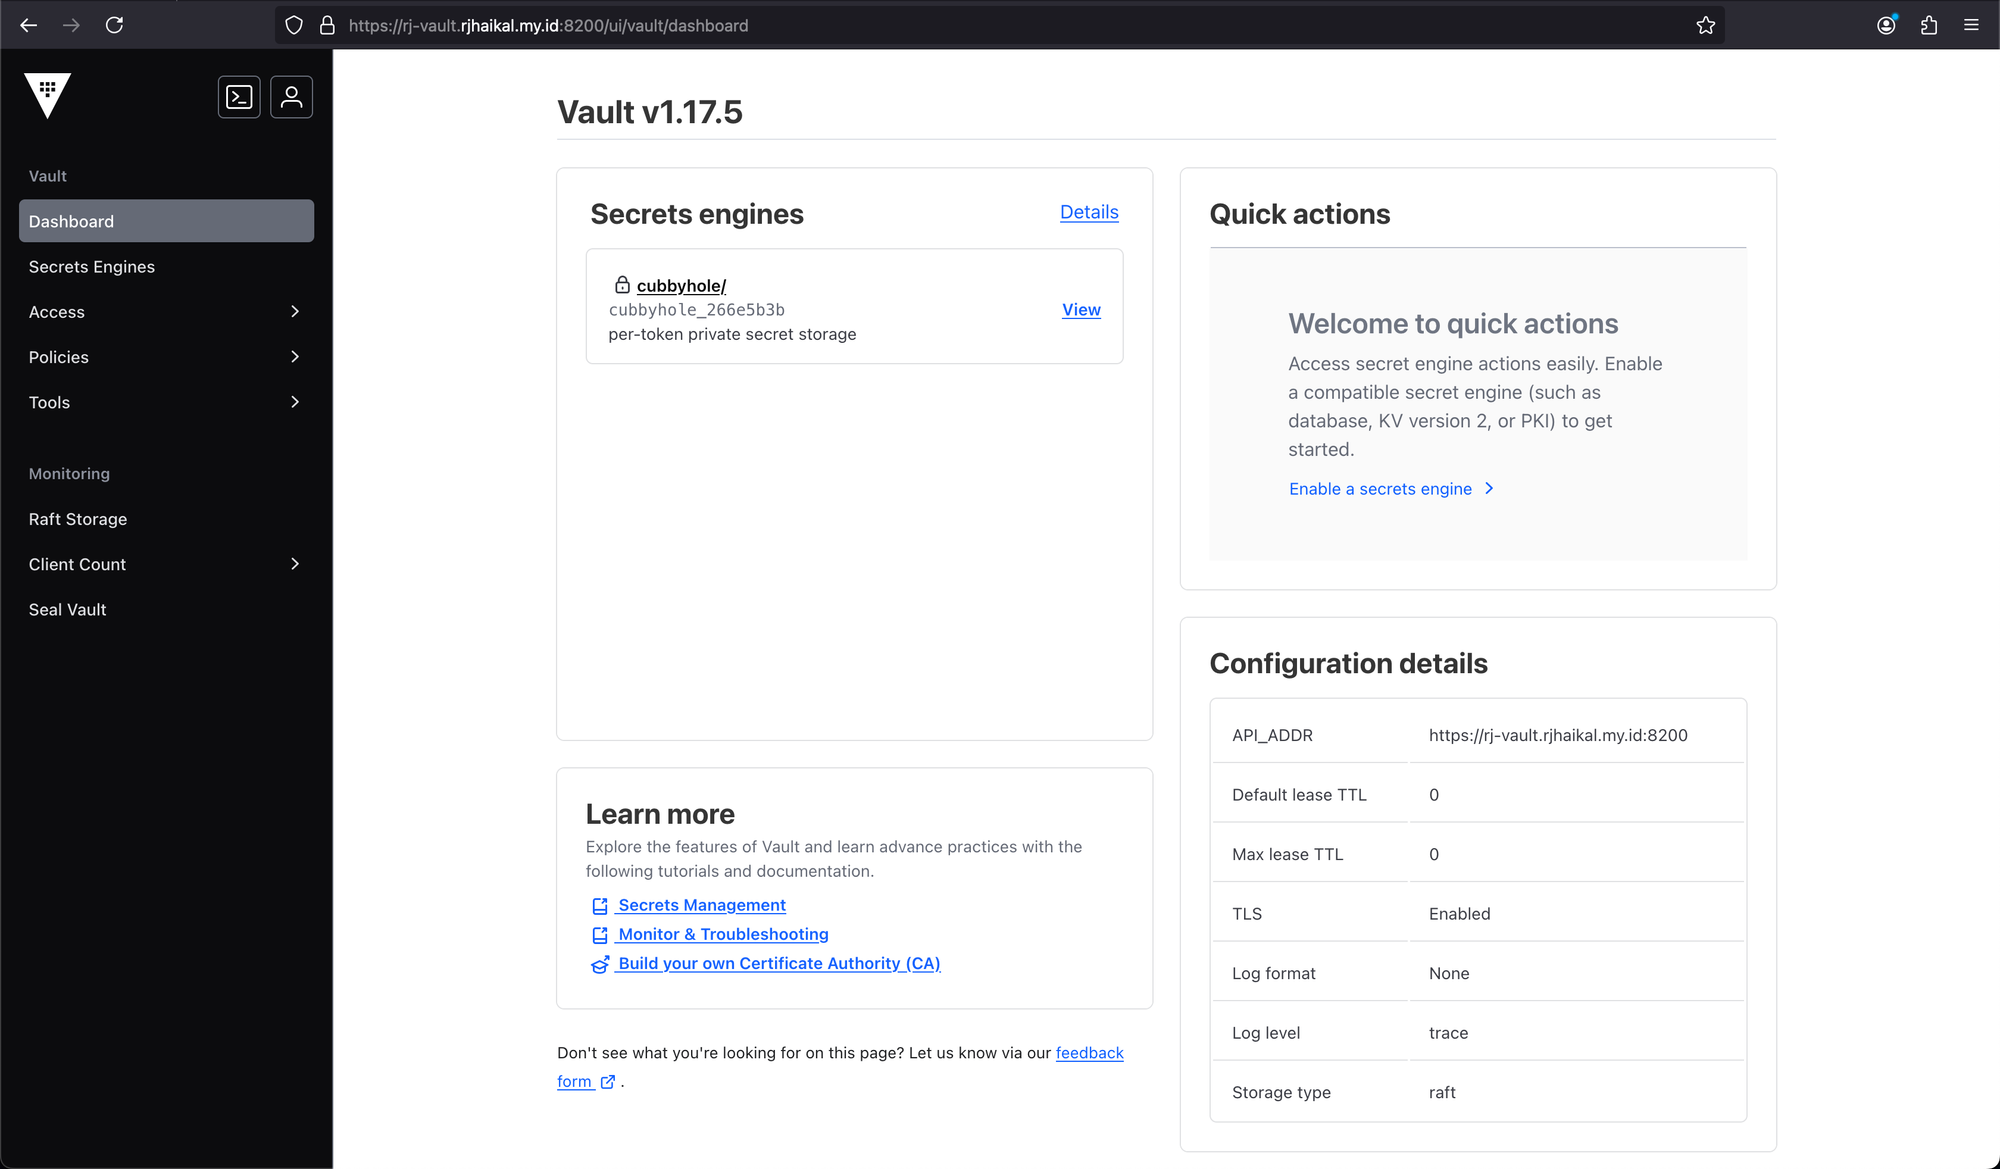
ui = true
disable_cache = true
disable_mlock = true
cluster_name = "RJ Vault"
log_level = "trace"
cluster_addr = "https://rj-vault-node1.rjhaikal.my.id:8201"
api_addr = "https://rj-vault.rjhaikal.my.id:8200"

storage "raft" {
  path = "/opt/vault/data"
  node_id = "rj-vault-node1"

#  retry_join {
#     leader_api_addr   = "https://rj-vault-node1.rjhaikal.my.id:8200"
#  }
#  retry_join {
#     leader_api_addr   = "https://rj-vault-node2.rjhaikal.my.id:8200"
#  }
#  retry_join {
#     leader_api_addr   = "https://rj-vault-node3.rjhaikal.my.id:8200"
#  }
}

listener "tcp" {
  address       = "0.0.0.0:8200"
  tls_cert_file = "/opt/vault/tls/fullchain.pem"
  tls_key_file  = "/opt/vault/tls/privkey.pem"
  tls_disable   = false
}

seal "awskms" {
  region     = "us-east-1"
  access_key = "<YOUR_AWS_ACCCESS_KEY>"
  secret_key = "<YOUR_AWS_SECRET_KEY>"
  kms_key_id = "1fc3ac51-5469-49a1-b007-7786276176f0"
}
Set correct permissions.
# Set permissions
sudo chown vault:vault /etc/vault.d/vault.hcl
sudo chmod 0644 /etc/vault.d/vault.hcl

# Restore SELinux context
sudo restorecon -RvF /etc/vault.d
Start and enable vault.service.
# Start and enable vault.service
sudo systemctl enable --now vault.service
If there are any errors, please check systemd logs.
journalctl -xeu vault4. Configurations on rj-vault-node2
Add the configurations under /etc/vault.d/vault.hcl
ui = true
disable_cache = true
disable_mlock = true
cluster_name = "RJ Vault"
log_level = "trace"
cluster_addr = "https://rj-vault-node2.rjhaikal.my.id:8201"
api_addr = "https://rj-vault.rjhaikal.my.id:8200"

storage "raft" {
  path = "/opt/vault/data"
  node_id = "rj-vault-node2"

#  retry_join {
#     leader_api_addr   = "https://rj-vault-node1.rjhaikal.my.id:8200"
#  }
#  retry_join {
#     leader_api_addr   = "https://rj-vault-node2.rjhaikal.my.id:8200"
#  }
#  retry_join {
#     leader_api_addr   = "https://rj-vault-node3.rjhaikal.my.id:8200"
#  }
}

listener "tcp" {
  address       = "0.0.0.0:8200"
  tls_cert_file = "/opt/vault/tls/fullchain.pem"
  tls_key_file  = "/opt/vault/tls/privkey.pem"
  tls_disable   = false
}

seal "awskms" {
  region     = "us-east-1"
  access_key = "<YOUR_AWS_ACCCESS_KEY>"
  secret_key = "<YOUR_AWS_SECRET_KEY>"
  kms_key_id = "1fc3ac51-5469-49a1-b007-7786276176f0"
}
Set correct permissions.
# Set permissions
sudo chown vault:vault /etc/vault.d/vault.hcl
sudo chmod 0644 /etc/vault.d/vault.hcl

# Restore SELinux context
sudo restorecon -RvF /etc/vault.d
Start and enable vault.service.
# Start and enable vault.service
sudo systemctl enable --now vault.service
If there are any errors, please check systemd logs.
journalctl -xeu vault5. Configurations on rj-vault-node3
Add the configurations under /etc/vault.d/vault.hcl
ui = true
disable_cache = true
disable_mlock = true
cluster_name = "RJ Vault"
log_level = "trace"
cluster_addr = "https://rj-vault-node3.rjhaikal.my.id:8201"
api_addr = "https://rj-vault.rjhaikal.my.id:8200"

storage "raft" {
  path = "/opt/vault/data"
  node_id = "rj-vault-node3"

#  retry_join {
#     leader_api_addr   = "https://rj-vault-node1.rjhaikal.my.id:8200"
#  }
#  retry_join {
#     leader_api_addr   = "https://rj-vault-node2.rjhaikal.my.id:8200"
#  }
#  retry_join {
#     leader_api_addr   = "https://rj-vault-node3.rjhaikal.my.id:8200"
#  }
}

listener "tcp" {
  address       = "0.0.0.0:8200"
  tls_cert_file = "/opt/vault/tls/fullchain.pem"
  tls_key_file  = "/opt/vault/tls/privkey.pem"
  tls_disable   = false
}

seal "awskms" {
  region     = "us-east-1"
  access_key = "<YOUR_AWS_ACCCESS_KEY>"
  secret_key = "<YOUR_AWS_SECRET_KEY>"
  kms_key_id = "1fc3ac51-5469-49a1-b007-7786276176f0"
}
Set correct permissions.
# Set permissions
sudo chown vault:vault /etc/vault.d/vault.hcl
sudo chmod 0644 /etc/vault.d/vault.hcl

# Restore SELinux context
sudo restorecon -RvF /etc/vault.d
Start and enable vault.service.
# Start and enable vault.service
sudo systemctl enable --now vault.service
If there are any errors, please check systemd logs.
journalctl -xeu vault6. Initialize the Vault cluster on rj-vault-node1 with KMS auto-unseal
Before initializing the cluster, make sure to check cluster status.
# Skip TLS certificate verification for self signed certificates
export VAULT_SKIP_VERIFY=true

# Export Vault Address
export VAULT_ADDR=https://rj-vault-node1.rjhaikal.my.id:8200
vault status
Key Value
--- -----
Seal Type awskms
Recovery Seal Type n/a
Initialized false
Sealed true
Total Recovery Shares 0
Threshold 0
Unseal Progress 0/0
Unseal Nonce n/a
Version 1.17.5
Build Date 2024-08-30T15:54:57Z
Storage Type raft
HA Enabled trueInitialize the vault cluster.
# Initialize the vault cluster with 5 key shares and a key threshold of 3
vault operator init -recovery-shares=5 -recovery-threshold=3
If the command succeeded, you would get an output like below. Please make sure to record it.
# The vault cluster has been initialized with 5 key shares and a key threshold of 3
Recovery Key 1: JBcwPXHrRkvtgnpfu9zwY37ZJydNqLsWYgS0JZ4B9GUx
Recovery Key 2: uLv25lvZxMlbRo5/901aScXvVtkdVRsMWRTRZbh9IpG9
Recovery Key 3: NNWTdCrHPzl9sdYUsVOfLMTFX8qzAI+xEJVI7/RFI5Ie
Recovery Key 4: GW7MNlKuDDsfAAnjF7AfOE5aHDbGm2qVoMxflbGMqNcN
Recovery Key 5: oKjlTzPwt4ytEoV4sdq9r19+jsJ8Q/pVJL0UH4+ldaKI

Initial Root Token: hvs.IxjZ3kKL9I5uf4fhfDharBn6

Success! Vault is initialized

Recovery key initialized with 5 key shares and a key threshold of 3. Please
securely distribute the key shares printed above.
Verify if the cluster is initialized and unsealed.
Key                      Value
---                      -----
Seal Type                awskms
Recovery Seal Type       shamir
Initialized              true
Sealed                   false
Total Recovery Shares    5
Threshold                3
Version                  1.17.5
Build Date               2024-08-30T15:54:57Z
Storage Type             raft
Cluster Name             RJ Vault
Cluster ID               b80d85db-9681-4aff-a9f9-0aa4e181d2b9
HA Enabled               true
HA Cluster               https://rj-vault-node1.rjhaikal.my.id:8201
HA Mode                  active
Active Since             2024-09-25T18:45:15.523667882+07:00
Raft Committed Index     877
Raft Applied Index       877
7. Join the rj-vault-node2 and rj-vault-node3 nodes to the cluster
When you initialize the rj-node-vault1, the other nodes should automatically initialize and unseal using raft replication. Please verify if the other cluster nodes are initialized and unsealed.
# Run this on both rj-vault-node2.rjhaikal.my.id and rj-vault-node3.rjhaikal.my.id
vault status
Key Value
--- -----
Seal Type awskms
Recovery Seal Type shamir
Initialized true
Sealed false
Total Recovery Shares 5
Threshold 3
Version 1.17.5
Build Date 2024-08-30T15:54:57Z
Storage Type raft
Cluster Name RJ Vault
Cluster ID b80d85db-9681-4aff-a9f9-0aa4e181d2b9
HA Enabled true
HA Cluster https://rj-vault-node1.rjhaikal.my.id:8201
HA Mode standby
Active Node Address https://rj-vault.rjhaikal.my.id:8200
Raft Committed Index 912
Raft Applied Index 912If the rj-vault-node2 and rj-vault-node3 cluster nodes are still uninitialized and sealed, please restart the vault service.
# Run this on both rj-vault-node2 and rj-vault-node3 nodes
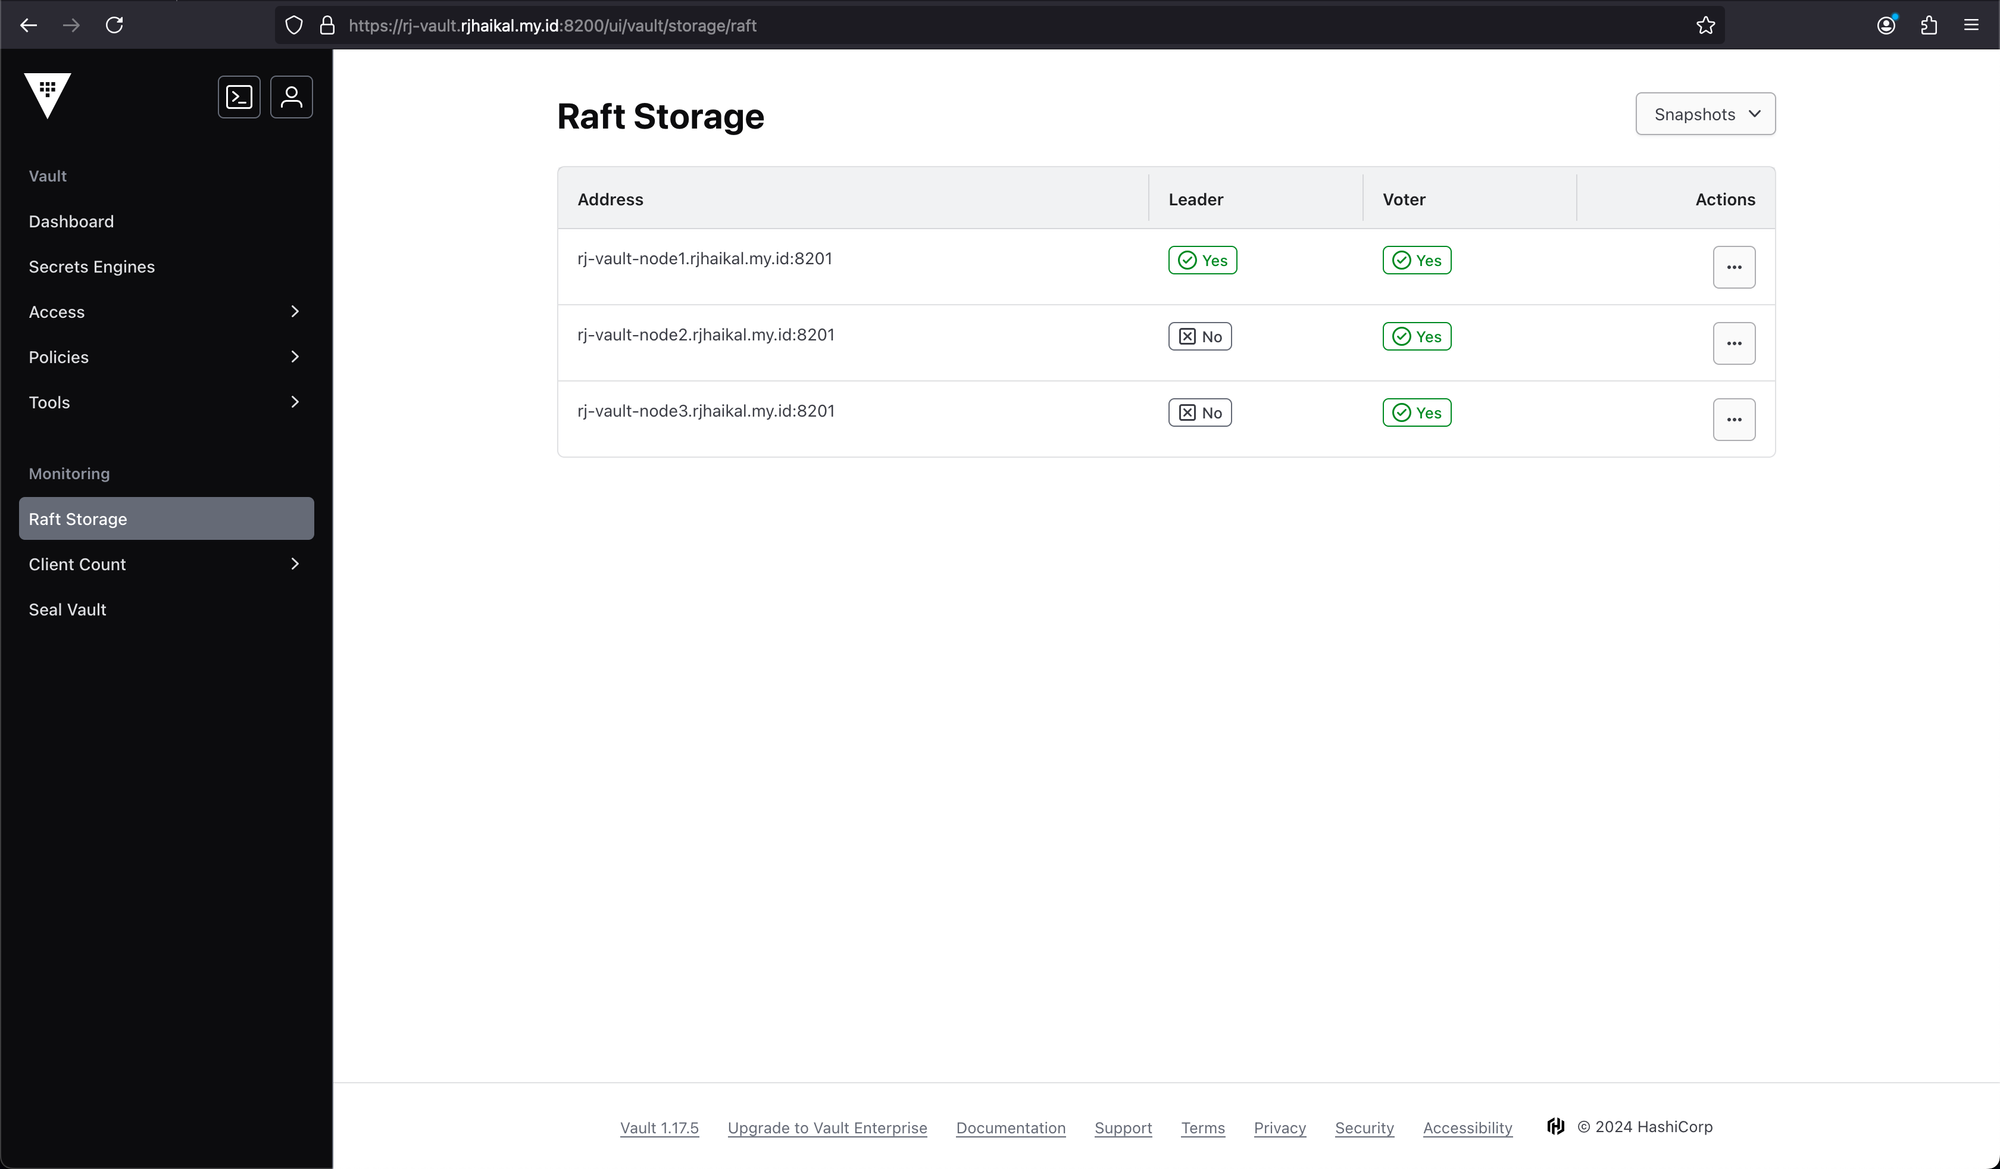
sudo systemctl restart vault.service8. Verify Raft List Peers
Run the following command on any node and verify if the cluster is active
# Export the vault token
export VAULT_TOKEN="hvs.IxjZ3kKL9I5uf4fhfDharBn6"

# List raft peer nodes
vault operator raft list-peers
Node Address State Voter
---- ------- ----- -----
rj-vault-node1 rj-vault-node1.rjhaikal.my.id:8201 leader true
rj-vault-node2 rj-vault-node2.rjhaikal.my.id:8201 follower true
rj-vault-node3 rj-vault-node3.rjhaikal.my.id:8201 follower trueHashicorp Vault Cluster High Availability using Keepalived
Info
- If you are using a cloud load balancer, you can SKIP this step. You have to use load balancer health checks instead.
- HashiCorp Vault health check path URL /v1/sys/health
1. Install Keepalived on All Nodes
Install Keepalived
# Install Keepalived package
sudo yum install -y keepalived
Allow VRRP traffic on the firewall.
# Allow VRRP traffic on the firewall
sudo firewall-cmd --permanent --add-rich-rule='rule protocol value="vrrp" accept'
sudo firewall-cmd --reload
2. Configure Keepalived on rj-vault-node1
Configure keepalived.
# /etc/keepalived/keepalived.conf
vrrp_script check_vault_leader {
    script "curl -k -s -o /dev/null -w '%{http_code}' https://localhost:8200/v1/sys/health | grep 200"
    interval 3
    weight 50
}

vrrp_instance VI_1 {
    state MASTER
    # Please make sure to verify interface name using 'nmcli connection show'
    interface eth0
    virtual_router_id 51
    priority 101
    advert_int 1

    authentication {
        auth_type PASS
        auth_pass Gladiators88!
    }

    virtual_ipaddress {
        192.168.11.100
    }

    track_script {
        check_vault_leader
    }
}
3. Configure Keepalived on rj-vault-node2
Configure keepalived.
# /etc/keepalived/keepalived.conf
vrrp_script check_vault_leader {
    script "curl -k -s -o /dev/null -w '%{http_code}' https://localhost:8200/v1/sys/health | grep 200"
    interval 3
    weight 50
}

vrrp_instance VI_1 {
    state BACKUP
    # Please make sure to verify interface name using 'nmcli connection show'
    interface eth0
    virtual_router_id 51
    priority 100
    advert_int 1

    authentication {
        auth_type PASS
        auth_pass Gladiators88!
    }

    virtual_ipaddress {
        192.168.11.100
    }

    track_script {
        check_vault_leader
    }
}
4. Configure Keepalived on rj-vault-node3
Configure keepalived.
# /etc/keepalived/keepalived.conf
vrrp_script check_vault_leader {
    script "curl -k -s -o /dev/null -w '%{http_code}' https://localhost:8200/v1/sys/health | grep 200"
    interval 3
    weight 50
}

vrrp_instance VI_1 {
    state BACKUP
    # Please make sure to verify interface name using 'nmcli connection show'
    interface eth0
    virtual_router_id 51
    priority 99
    advert_int 1

    authentication {
        auth_type PASS
        auth_pass Gladiators88!
    }

    virtual_ipaddress {
        192.168.11.100
    }

    track_script {
        check_vault_leader
    }
}
5. Start Keepalived and Verify if the VIP assigned to a node
Start and Enable keepalived.service
# Start and enable vault.service
sudo systemctl enable --now keepalived.service

# Verify if the service is started
sudo systemctl status keepalived.service
Check if the floating IP is assigned to a node.
# Run this command on All nodes. One node should show it is assigned
sudo ip addr | grep 192.168.11.100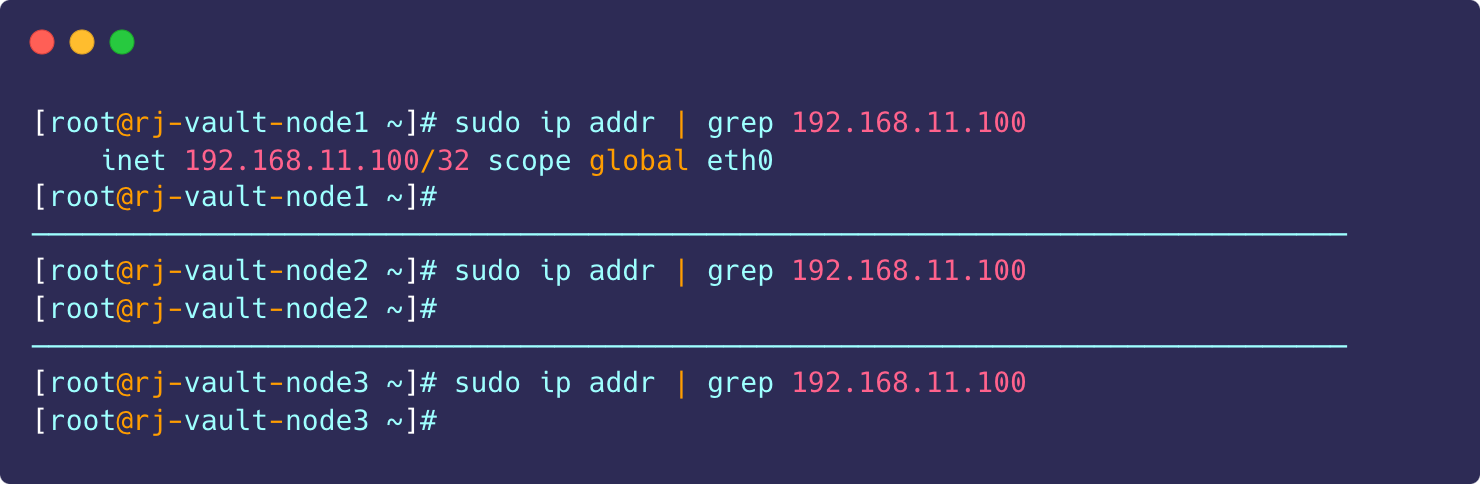
Verify Endpoint.
# Export the vault address and token
export VAULT_ADDR=https://rj-vault-node1.rjhaikal.my.id:8200
export VAULT_TOKEN="hvs.IxjZ3kKL9I5uf4fhfDharBn6"

# List raft peer nodes
vault operator raft list-peers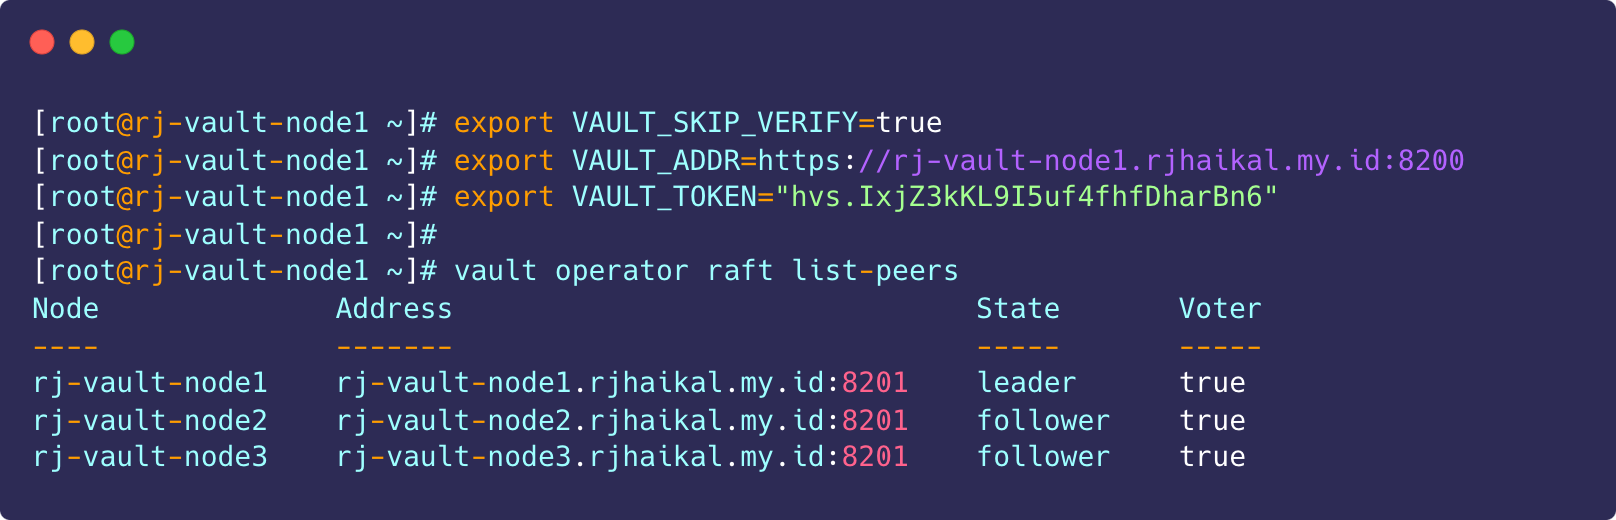
Maintenance
1. Backup and restore vault cluster using raft snapshots
Create a snapshot of raft storage.
# Skip TLS certificate verification for self signed certificates
export VAULT_SKIP_VERIFY=true

# Export the vault token
export VAULT_TOKEN="hvs.IxjZ3kKL9I5uf4fhfDharBn6"

# Create a snapshot of raft storage
vault operator raft snapshot save raft-$(date +"%Y-%m-%d").snap
Restore a snapshot of raft storage.
# Skip TLS certificate verification for self signed certificates
export VAULT_SKIP_VERIFY=true

# Export the vault token
export VAULT_TOKEN="hvs.IxjZ3kKL9I5uf4fhfDharBn6"

# Create a snapshot of raft storage
vault operator raft snapshot restore -force raft-$(date +"%Y-%m-%d").snap
2. Migrate vault cluster using raft snapshots
Info
- If you want to clone/migrate a vault cluster to a new cluster with a new AWS KMS key, please follow these steps.
- Let's assume the NEW KMS_KEY_ID and KMS ARN values are "a87234c9-4501-47ae-8db4-ee818432ad5d" and "arn:aws:kms:us-east-1:741448959034:key/a87234c9-4501-47ae-8db4-ee818432ad5d" respectively.
Create a snapshot of raft storage of the old vault cluster.
# Export the vault token
export VAULT_TOKEN="hvs.IxjZ3kKL9I5uf4fhfDharBn6"

# Create a snapshot of raft storage
vault operator raft snapshot save raft-$(date +"%Y-%m-%d").snap
To restore the cluster, you must have access to both OLD and NEW AWS KMS keys. Please create/update the IAM policy and attach it to the corresponding IAM User/Role.
# Example:
# Create an IAM user/role with the following policy
{
	"Version": "2012-10-17",
	"Statement": [
		{
			"Sid": "Statement1",
			"Effect": "Allow",
			"Action": [
				"kms:Decrypt",
				"kms:Encrypt",
				"kms:DescribeKey"
			],
			"Resource": [
			    "arn:aws:kms:us-east-1:741448959034:key/1fc3ac51-5469-49a1-b007-7786276176f0",
                "arn:aws:kms:us-east-1:741448959034:key/a87234c9-4501-47ae-8db4-ee818432ad5d"
			]
		}
	]
}
Please make sure to use the NEW KMS key in the /etc/vault.d/vault.hcl.
seal "awskms" {
  region     = "us-east-1"
  access_key = "<YOUR_AWS_ACCCESS_KEY>"
  secret_key = "<YOUR_AWS_SECRET_KEY>"
  kms_key_id = "a87234c9-4501-47ae-8db4-ee818432ad5d"
}
Initialize the NEW vault cluster.
# Initialize the vault cluster with 1 key shares and a key threshold of 1
vault operator init -recovery-shares=1 -recovery-threshold=1
# The vault cluster has been initialized with 1 key shares and a key threshold of 1
Recovery Code 1: GzFhT7mPvK9bWQrN3v8JTw6LcUbRpYhXqLnMe9WDt5Y
Primary Root Token: hvs.nQsdJp3vYs6md8anW6XhdfYLP
Success! Vault is initialized
Recovery key initialized with 1 key shares and a key threshold of 1. Please
securely distribute the key shares printed above.Verify if the cluster is initialized and unsealed.
vault statusImport vault backup.
# Export the NEW cluster vault token
export VAULT_TOKEN="hvs.nQsdJp3vYs6md8anW6XhdfYLP"

# Restore the snapshot
vault operator raft snapshot restore -force raft-$(date +"%Y-%m-%d").snap
Verify if the cluster is initialized and unsealed.
vault statusRemove the OLD KMS ARN entry from IAM policy.
{
	"Version": "2012-10-17",
	"Statement": [
		{
			"Sid": "Statement1",
			"Effect": "Allow",
			"Action": [
				"kms:Decrypt",
				"kms:Encrypt",
				"kms:DescribeKey"
			],
			"Resource": [
                "arn:aws:kms:us-east-1:741448959034:key/a87234c9-4501-47ae-8db4-ee818432ad5d"
			]
		}
	]
}
References